University of California San Francisco Give to UCSF

UCSF IT Technology

Main navigation

  • Status
    • Security Announcements
  • Services
    • Projects
  • How To
  • News & Events
  • About Us
  • Log In
Open Close Search
Open menu
Give to UCSF

Breadcrumb

  1. Home
  2. How To
  3. Cisco Jabber UC Training: Persistent Chat Rooms

This content is viewable by Everyone

Cisco Jabber UC Training: Persistent Chat Rooms

Save

Log in via MyAccess to save.

  • Audience: Faculty, Staff, Student
  • Service Category: Phones & Pager
  • Owner Team: IT DWS Unified Comms
  • Service:
    Cisco Jabber UC

Creating Persistent Chat Rooms in Cisco Jabber

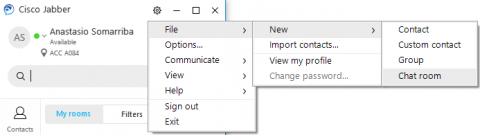
  1. To start, click on the Settings wheel on the top right of the client.
  2. Click on File>New>Chat Room (File > New Chat Room on Mac client).
     
    Cisco Jabber Create Chat Room
  3. Select the appropriate settings for your new chat room (e.g., Name, Description, Public or Restricted). Optional: On the screen shown below, you can also choose a password (By clicking the password button) and a moderator for the chat room you are creating.
     
    Cisco Jabber Create Persistent Chat
  4. For the Location, choose the Automatically select field from the drop-down menu.
  5. Click the Create button to create the room.

Your newly created chat room will show in the My Rooms pane on the left side of the Jabber client.

Related Information

  • Cisco Jabber UC Training
Section Menu
Cisco Jabber UC
  • Cisco Jabber UC Training
  • Cisco Jabber UC FAQs
Home

Footer Col 1

  • Status
  • Services
  • How To
  • News & Events

Footer Col 2

  • About
  • IT Directory
  • Standards & Guidelines

Footer Col 3

  • Get Help
  • Recognize IT Staff
  • Submit a Support Inquiry

    For emergencies and high priority issues please call the IT Service Desk (415) 514-4100

    • Facebook
    • Twitter
    • YouTube
    • Instagram

    © 2025 The Regents of the University of California