Overview
Within your role at UCSF, you might be assigned many different and competing tasks to be completed. ask management might be difficult to manage if you are flagging an email or keeping a word document detailing all your tasks for a given day.
Microsoft 365 offers several options for task management that are interconnected and accessible in the applications/ devices where you typically complete your work.
This article will demonstrate how to create and share tasks within Outlook, To Do, Tasks By Planner and To Do, and Planner.
Outlook
In Outlook, you are able to create Tasks from the Tasks tab in the Outlook Web App (OWA) or Outlook application for Mac.
NOTE: Currently, the Legacy version of Outlook is the only supported desktop version of Outlook for Mac computers at UCSF.
Creating and Completing Tasks in OWA
- Navigate to Outlook
- Click the Task Icon
- Select Add a Task
- Enter information for the Task
- Click the Add button
- Task has been added to the Tasks list
After the task has been created and added to the list, you can add additional information by right clicking the task. Some of the options include: setting the Importance level (This can also be achieved by selecting the Star next to the title), add a reminder or due date, move the task to a specific List (in the Tasks by Planner and To Do app for Teams) or open the task in the To Do desktop application.
As you complete your tasks throughout the day, simply click the Circle next to the task to mark it complete. If you want to review your completed Tasks, select the Show Recently Completed to view your list of completed tasks.
Creating and Completing Tasks in Outlook Desktop
NOTE: You will not be able to see the Task tab in the new version of Outlook for Mac as the task tab will load the web version of the To Do app. You can switch from the new version of Outlook for Mac to the legacy version by navigating to Help and selecting the Revert to Legacy Outlook link.
1. Load the Microsoft Outlook desktop application (NOTE: This requires VPN)
2. Select the Task icon
3. Click the New Task button
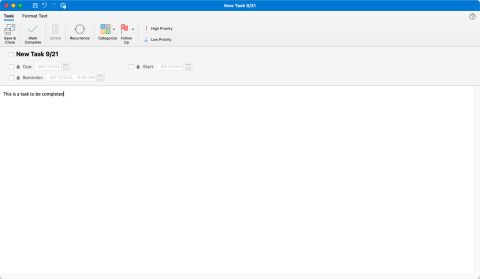
4. When the Untitled Task window loads add the following information:
a. Enter a Title
b. Enter information about the task
c. Set a Due Date and Reminder
d. Define the priority of the Task by selecting the High or Low Priority buttons
NOTE: If this is a recurring task, select the Recurring button to set when and for how long this task will occur
5. Click the Save and Close button to save your task
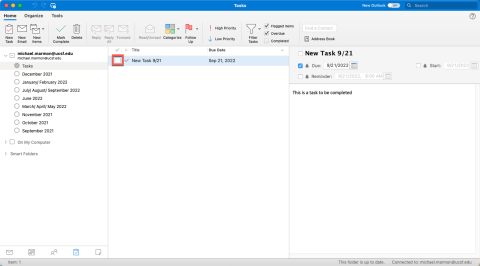
6. When ready, the task can be completed by selecting the Checkbox next to the task
When tasks are created in Outlook OWA or the Outlook desktop application, you can access them from within the Planner app in Microsoft Teams and Microsoft To Do on the web.
NOTE: Any tasks created in Outlook are for personal task management and cannot be shared. However, tasks created in To Do or Planner can be shared and assigned to others.
To Do
The To Do app can be accessed either as a desktop application (for Windows and Mac) or on the web. You can access any of your tasks created from Outlook in Microsoft To Do by selecting the Tasks tab after logging in.
Organizing Tasks in To Do
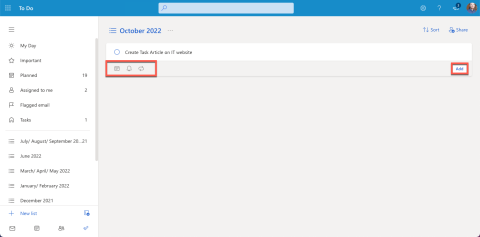
Tasks can be organized in a list view by selecting the New List link then entering a name for the list and clicking Enter on your keyboard. Tasks can then be created after the list loads successfully by entering information (including Due Date, Reminder, and Recurrence) for the task before clicking the Add button.
Creating Tasks in To Do
If you want to track your daily tasks, you can create tasks without first creating a list by completing the following steps:
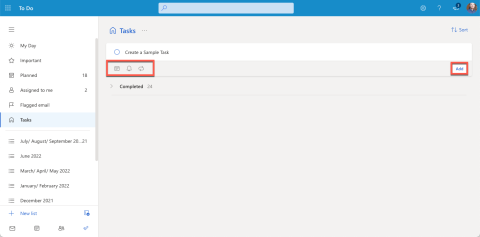
1. Select the Tasks icon
2. In the Add a task field enter a name for the task
You can enter the following (optional) information for a task:
a. Enter a Due Date
b. Add a reminder (e.g. For today, tomorrow, next week or a specific date and time)
c. Add a recurrence if you will need a task to be completed on a regular schedule
3. Click the Add button
When a task is created in To Do, it can be accessed in Microsoft Teams using the Planner integration as well as Outlook (e.g. Windows, OWA and Legacy Outlook for Mac) under the Tasks tab.
Planner
Microsoft Planner is an application to organize and manage the work that you and your team completes every day. When you create tasks in Planner, they can be accessed within Microsoft Teams in the Planner integration. To learn more about how to use Microsoft Planner, please review the Planner Training Resources.
Creating Tasks in Planner
After the plan is configured with MS Planner, you can populate your buckets with Tasks to be completed.
1. Select the Add Task link under any bucket heading
2. Enter a Task Name
3. Set a Due Date
4. Assign the Task to a member of the plan
5. Click the Add Task button
6. Double click the task to add other information (e.g. Priority, Notes, Attachments etc.)
Viewing Planner Tasks in Teams
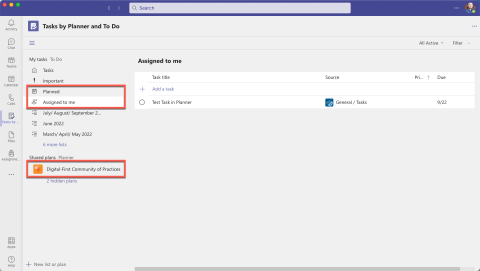
Once a Planner task is created, it can be viewed within the Planner Teams integration by selecting the Planner icon. Tasks created in Planner can be viewed by selecting the My Plans link then select the desired plan under the Shared option. Also, if a plan is shared with you, you can view all current tasks within the plan too.
Planner Integration in Microsoft Teams
If you use Microsoft Teams as part of your day-to-day workflows, you can access or create new tasks using the Planner integration. Tasks created in Planner can be viewed in Outlook under the Tasks tab (e.g. Windows, OWA and Legacy Outlook for Mac).
Add Planner Integration
1. In Microsoft Teams, click the Apps icon
2. Select the Planner tile
3. Click the Add button (Select the downward arrow to Add Tasks to a Team)
Organizing Tasks in Planner
1. Click the Planner icon
2. Select the New List button
3. Enter a Name for the List or Plan
4. Under Create in, select My tasks (Private list) or select a Team to create a public list of tasks to collaborate on
Creating from within Tasks By Planner and To Do
1. Select the My Plans tab then select an existing plan
2. Select the Add Task field, enter a name for the Task
3. Add a Due Date to organize tasks
4. Select the Add Task to add the Task (The X will discard the task)
5. Click the task to add additional information such as a note or a checklist
6.Select the X to save and close the task

