Return to UCSF Voicemail service page
Overview
- What is UCSF voicemail?
- Is there a fee for voicemail services?
- Which telephones use this voicemail service?
Setup
- How do I access and set up my voicemail for the first time?
- How do I change my (or retrieve a lost) Personal Identification Number (PIN)?
- Will I get notified of missed calls with Cisco Unity Connection voicemail?
- How can I set up a menu to direct callers (e.g., press 1, press 2) dialing a UCSF phone number?
Voice commands
- What are voice commands?
- What are the voice commands menu options?
- How do I activate voice command menu options?
How-tos
- How do I record my name?
- How do I record alternate greetings?
- How do I reply to a voicemail message?
- How do I forward a voicemail message?
- How do I listen to a voicemail message via touch-tone phone?
- What's the best way to save or archive a voicemail message?
- If I delete a voicemail message from my Outlook email inbox, am I still able to listen to the message from my phone?
- How do I set up call-answering rules for voicemail?
- Is it okay for people to leave me confidential information, such as patient or personal information, on a UCSF voicemail message?
- Is the UCSF voicemail system secure?
Cisco Phone Quick-Start Guides
Overview
What is UCSF voicemail?
- UCSF uses Cisco Unity Connection, a unified messaging system that enables users to receive, access, and manage voicemail messages through their email inbox and by dialing into the voicemail system via a phone access number.
Is there a fee for voicemail services?
- There is no additional fee for UCSF voicemail.
Which telephones use this voicemail service?
- Cisco Unity Connection voicemail is available to Campus and Medical Center employees using Cisco phone systems.
- For telephone numbers beginning with prefix 206 at Zuckerberg San Francisco General Hospital, contact the IT staff at the San Francisco Department of Health.
- Cisco Unity Connection is not available to:
- BCH Oakland phones. Report a BCH Oakland telecom issue by completing this form.
- Nortel-Avaya phones. For those phones, a ticket must be submitted.
- Nortel/Avaya locations:
- 900 Hyde Street, San Francisco
- 909 Hyde Street, San Francisco
- 1199 Bush Street, 1st floor, San Francisco
- 1777 Botelho Drive, suite 110, Walnut Creek
Setup
How do I access and set up my voicemail for the first time?
1. Call the voice access number appropriate for your location, as listed below:
- From a Cisco phone, call 66000 or press the Message Waiting button on your phone.
- From a non-Cisco phone, call 415-476-6000 and press the Star key when you reach the voicemail system. You will be prompted for your ID. Enter your 5-digit phone extension number (last 5 digits of your phone number).
- From a Cisco phone at Stanyan Hospital and clinics, call 415-476-6000 and press the Star key when you reach the voicemail system. You will be prompted for your ID. Enter your full 10-digit phone number.
2. Enter your Personal Identification Number (PIN), and press #. Note: If this is your first time logging in, enter your temporary PIN and press #. You will be prompted to select a new PIN and enter it. Your temporary PIN will be provided when your account is set up.
How do I change my (or retrieve a lost) Personal Identification Number (PIN)?
- Note: You cannot change your PIN more than once in a 24-hour period.
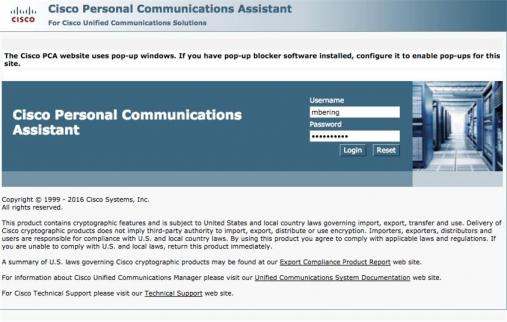
- To change your PIN, log into the Cisco Personal Communication Assistant (PCA) web portal:
- Access the PCA web portal. If you have issues, copy and paste this URL https://voicemail.ucsf.edu/ into your browser.
- Enter your UCSF username (not your full UCSF email address) and password in the respective fields.
Click the Login button.
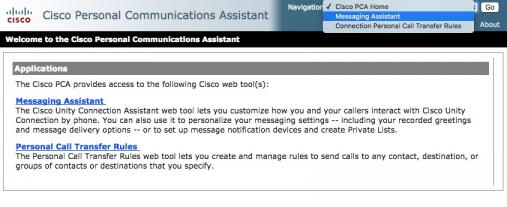
From the Home page, go to the Messaging Assistant by clicking the link or through the Navigation menu. If using the Navigation menu, select Messaging Assistant and then click the Go button.
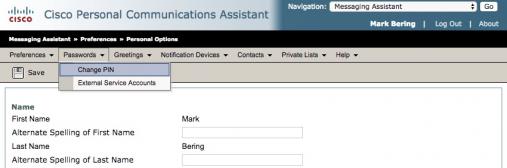
On the Messaging Assistant page, go to the Passwords menu and select Change PIN.
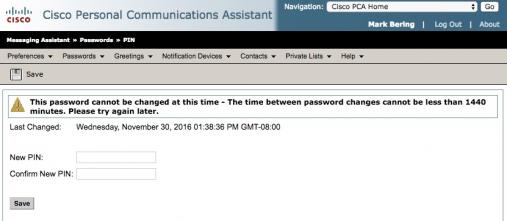
On the Change PIN screen, enter your new PIN in both the New PIN and Confirm New PIN fields, then click the Save button.
Reset by phone
Alternatively, you can reset your PIN by calling 415-514-8810:
- Enter your 10-digit phone number, followed by the # key.
- Press 1 to confirm your extension.
A temporary PIN will be sent to the email address associated with your voicemail box.
Note: This automated reset option only works if your voicemail account has a valid email address on file.
Once your PIN is reset, you can access your voicemail by dialing 66000 from a Cisco phone or 415-476-6000 from a non-Cisco phone.
Will I get notified of missed calls with Cisco Unity Connection voicemail?
- Yes. Notifications of missed calls can be delivered to your inbox. This feature must be requested. Learn how to request this and other features.
How can I set up a menu to direct callers (e.g., press 1, press 2, etc.) dialing a UCSF phone line?
- Requesting auto-attendant/phone tree requires submitting a ticket.
Voice commands
What are voice commands?
- Using a touch-tone phone, you can access the Cisco Unity Connection voicemail system by dialing 66000 on a Cisco phone or 415-476-6000 on a non-Cisco phone to retrieve voicemail and your calendar. Voice command access is enabled in the Personal Communications Assistant (PCA) web portal. Access the voicemail system by copying and pasting https://voicemail.ucsf.edu/ into your browser.
- Voice command allows you to complete the following tasks:
- Retrieve, listen to, reply to, create and forward voice messages
- Listen to or change calendar information
- Change personal options, such as changing a PIN, or call or send a voice message to a voicemail contact.
What are the voice commands menu options?
- Play messages: Listen to new voicemail messages and delete messages.
- Play emails: Listen to new email messages and delete messages.
- Play meetings or List meetings: Listen to your schedule for the day, send "I’m running late" messages, cancel meetings or contact the meeting organizer.
- Call: Call a voicemail contact.
- Directory: Locate a contact by first name and last name.
- Play greeting: Play a specified greeting.
- Change my PIN: Change settings for your mailbox including your PIN.
- Note: To enable voice commands, access the PCA web portal or by copying and pasting this URL https://voicemail.ucsf.edu/ into your browser. Switch your voicemail input type to voice recognition.
How do I activate voice command menu options?
- To enable voice command options, complete the following steps:
- Call the UCSF voicemail system using the number appropriate for your location, then log in.
- Press 9 to start using the voice command interface.
- Press 1 to confirm that you want to switch to voice commands.
- Note: When you delete a voicemail using the telephone system, the voicemail (email with sound file attachment) is also deleted from your Outlook inbox.
How-tos
How do I record my name?
- It is highly recommended that you record a personal greeting including your name to personalize your voicemailbox. If you do not record your name, callers will hear a computer-recorded voice that speaks your name.
- Call the Cisco Unity Connection voicemail system (dial 66000 on a Cisco phone or 415-476-6000 on a non-Cisco phone) and log in.
- From the main menu, press 4 to go to setup options.
- Press 3 to select your preferences.
- Press 2 to record your name.
- To accept your recording, press 1.
- To reject your recording and re-record, press 2.
How do I record alternate greetings?
- You can set an alternate greeting for when you're out of the office or on another call, for example.
- Call the Cisco Unity Connection voicemail system (dial 66000 on a Cisco phone or 415-476-6000 on a non-Cisco phone) and log in.
- From the main menu, press 4 to go to setup options.
- Press 1 to go to your greetings menu.
- Press 3 to edit your greetings.
From the greetings menu, press:
Keypad
Greeting
1
Standard - plays during normal business hours
2
Closed - plays after standard business hours
3
Alternate - plays during a specific time period when you want to indicate special circumstances
4
Busy - plays when you are on another phone call
5
Internal - plays when your internal number is dialed
6
Holiday - Plays a special greeting during a holiday
Sample greeting: "Thank you for calling. You have reached the voicemail box for [Name]. Please leave a detailed message, and I'll return your call as soon as possible.
- Press 1 to record your greeting.
- Press # when you have finished recording.
- When finished leaving your message, you may press # for additional options or hang up. In the future, you may press # to bypass this greeting and leave a message.
How do I reply to a voicemail message?
- To reply to a voicemail message, complete the following steps:
- Call the Cisco Unity Connection voicemail system (dial 66000 on a Cisco phone or 415-476-6000 on a non-Cisco phone) and log in.
- When prompted, say "Play messages." Your most recent voicemail message is read. If necessary, say "Next message" repeatedly until you locate the desired message.
- Say "Reply" to reply to the message. When prompted, record your message. Press # when you are finished.
How do I forward a voicemail message?
- To forward a voicemail message, complete the following steps:
- Call the Cisco Unity Connection voicemail system (dial 66000 on a Cisco phone or 415-476-6000 on a non-Cisco phone) and log in.
- When prompted, say "Play messages." Your most recent voicemail message is read. If necessary, say "Next message" repeatedly until you locate the desired message.
- Say "Forward" to forward the message. Outlook voice access will ask you to search the directory to locate the name of the person to whom you wish to send the message. For the person you wish to find, (1) say the last name first or (2) spell the person's email address. When prompted, record your message.
How do I listen to a voicemail message via touch-tone phone?
- To listen to voicemail, complete the following steps:
1. Call the Cisco Unity Connection voicemail system (dial 66000 on a Cisco phone or 415-476-6000 on a non-Cisco phone), then log in to your mailbox.
- From a Cisco phone, call 66000 or press the Message Waiting button on your phone.
- From a non-Cisco phone, call 415-476-6000 and press the Star key when you reach the voicemail system. You will be prompted for your ID. Enter your 5-digit phone extension number (last 5 digits of your phone number).
- From a Cisco phone at Stanyan Hospital and clinics, call 415-476-6000 and press the Star key when you reach the voicemail system. You will be prompted for your ID. Enter your full 10-digit phone number.
2. When prompted, press 1 for voicemail. Your most recent voicemail message is read.
3. While listening, press any of the following:
- Press 1 to move back to the beginning of the message.
- Press 8 to pause the message.
- Press 9 to fast-forward and skip portions of the message.
- Press 66 to have the message play faster.
- Press # to go to the end of the current message.
4. After listening, press any of the following:
- Press # to save message as is and move to the next message in your mailbox.
- Press 3 to delete the message. Note: When you delete a voicemail using the telephone system, the voicemail (email with sound file attachment) is also deleted from your Outlook mailbox.
- Press * to return to the main menu.
What's the best way to save or archive a voicemail message?
The best way to save or archive a voicemail message is to download the audio attachment from your voicemail email and store it securely.
How to do it
- Open the voicemail in your inbox
- Download the attached audio file (usually a .wav file)
- Save it to a folder on your computer or a secure network/shared drive
Tips
- Use clear file names (e.g., VM_Name_Date.wav)
- Store files in a secure location if they contain sensitive information
- Back up important messages if needed
Note: Voicemails stored in the phone system may be deleted over time, so saving the audio file ensures you keep a permanent copy.
If I delete a voicemail message from my Outlook email inbox, am I still able to listen to the message from my phone?
- No. When you delete a voicemail message in Outlook after listening to it, the message is no longer accessible by phone. Find deleted voicemail messages in your Outlook Deleted Items folder. You can move it back to your inbox or any other folder you have created. If you want to access the voicemail by phone again, you must mark the message Unread in Outlook.
- When you delete a voicemail message by phone, the message is no longer accessible by email.
Is it okay for people to leave me confidential information, such as patient or personal information, on a UCSF voicemail message?
- Although it is acceptable for people to leave confidential messages in voicemail, we strongly recommend you treat it like any sensitive electronic information and delete it as soon as possible after it is no longer needed.
- This will help prevent you from accumulating email messages with sensitive information. In addition, keeping as little as possible in your mailbox helps protect both you and UCSF.
Is the UCSF voicemail system secure?
- Yes. Voicemail messages are stored within the UCSF email system and are treated with the same security controls as standard email messages. Email is already used for restricted information.
- Please be aware that it is prohibited to automatically forward secure or nonsecure email or voicemail messages from your Outlook email to an external email service.
- However, you may choose to manually forward a voicemail message to another UCSF Outlook email address, just as you would any other standard email message. If the message contains restricted data, the subject line of the email should contain one of the following keywords, including the colon:
- ePHI:
- PHI:
- Secure:
How do I set up call-answering rules for voicemail?
Call-answering rules allow you to choose how specific calls will be handled when you are away. These rules are set up using the Personal Communication Assistant (PCA) web portal.
- To set up rules, access the PCA web portal or by copying and pasting this URL https://voicemail.ucsf.edu/ into your browser.
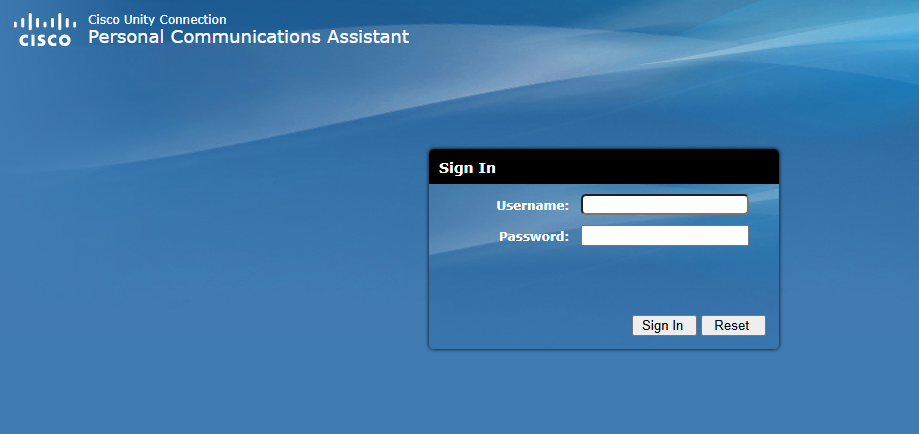
2. Enter your UCSF email account username and password in the respective fields.
3. Click the Sign In button.
4. You will see this screen. Enter your username and password and click Login.

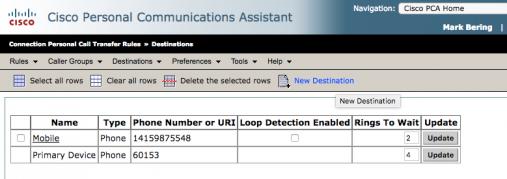
8. Enter a name and phone number or URI for your destination, set the number of Rings to Wait, and choose whether to enable Loop Detection. Click the Save button to create your destination. 
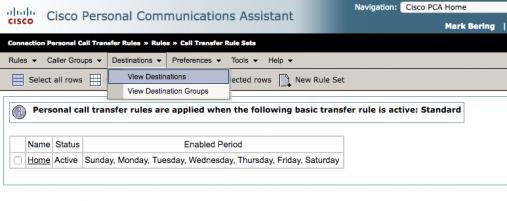
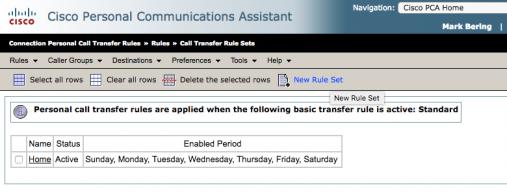
9. Now that you have a defined destination, you can set up a basic transfer rule. Go to the Rules menu and select View Call Transfer Rule Sets from the drop-down menu.
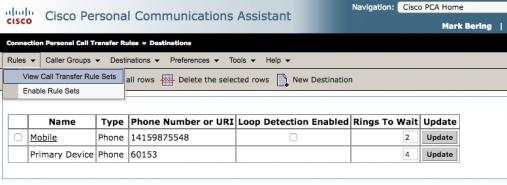
10. Click on the New Rule Set link to set up a new rule set.
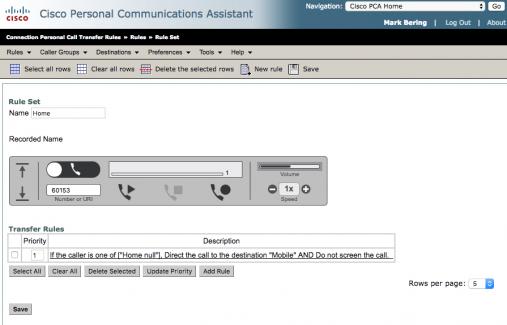
11. Enter a name for your new rule set in the Name field.
12. Use the media player to record the name of your rule set to use with the voice command features.
13. Click the Save button.
Set parameters
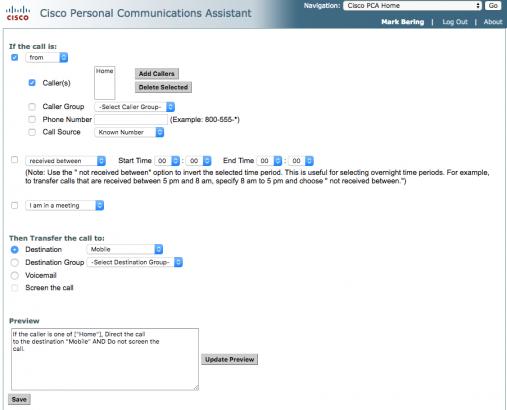
We are now going to configure the rule-set parameters:
- If the rule set will be based on phone numbers, check the From/Not From menu and choose the appropriate option.
- If the rule set will be time-constrained, check the Received Between/Not Received Between menu and choose the appropriate option.
- If the rule set will be based on your calendar availability, check the I am in a meeting/I am not in a meeting menu and choose the appropriate option.
- Define the action to be taken by setting the Then transfer the call to: function by clicking the appropriate radio button.
- Click the Update Preview button to see a description of what the rule set will do.
- Click the Save button.
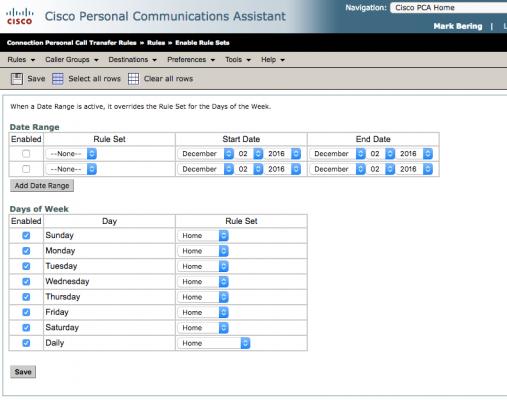
Active your rule set
1. To activate your rule set, go to the Rules menu and select Enable Rule Sets from the drop-down menu.
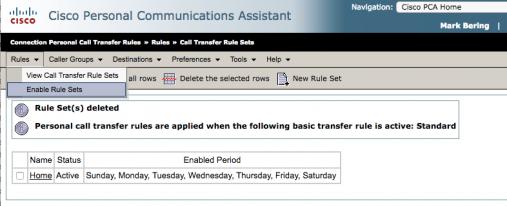
2. Rule sets can be enabled by date range or days of the week. Choose when your rule set will be active by checking the appropriate box in the Enabled column (expand your date range by clicking the Add Date Range button).
3. Click the Save button.
- In this documentation, you set up a simple rule. For more information, please see The Personal Calls Transfer Web Tool.
Note: If you are using a non-UCSF number in your call-answering rule, you must prefix the number with "9+1". Example: 9-1-415-222-1212. You will not be required to prefix a UCSF number.