This content is viewable by Everyone
News
Recommended Security Settings for Zoom
-
Author: Tanya Jansen
- Date:
UCSF requires Zoom meetings and webinars to be secured by either using the Waiting Room feature or a passcode. Although the following requirements have been implemented by default, this alone does not entirely prevent unwanted participants from joining a Zoom meeting/webinar. Follow the steps below to increase the privacy of your Zoom meetings and webinars. Be prepared to take action should an uninvited participant join.
How to Securely Advertise Zoom Meetings
Important: Never publish Zoom meeting links, meeting IDs or passcodes to social media or public-facing sites.
- Only post the meeting date/time
- Specify a contact person to email the meeting link
- Use Zoom registration with manual approval
- For internal meetings: Send email invites, advertise on internal UCSF sites that require MyAccess authentication or an approved file-sharing site
- Assign an alternative host when you schedule a meeting
Meeting Security Settings
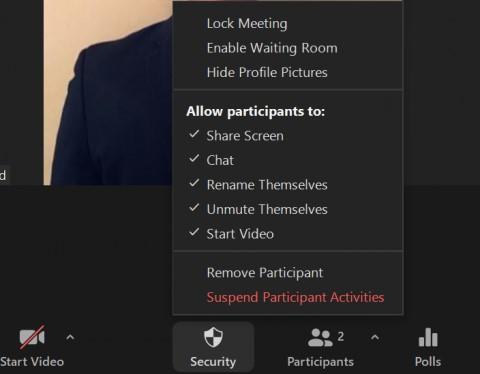
The quickest way to secure your meeting after it has started it to use the Security icon at the bottom of your Zoom window and uncheck the options listed under, “Allow Participants To” (see screenshot, below).
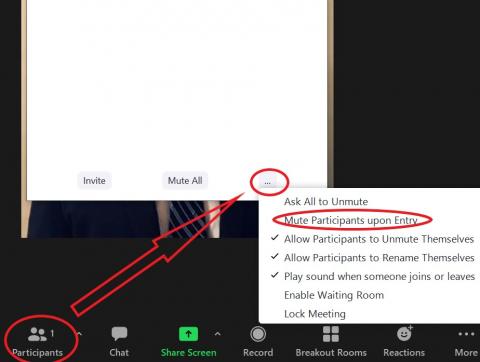
Mute Participants Upon Entry
- At the bottom, right-hand corner, you will see 3 horizontal dots
- Select the three dots to view a drop-down menu
- Select "Mute Participants upon Entry"
Waiting Room
Consider using the Waiting Room to avoid unwanted participants. When enabled, the host of the meeting will be required to admit participants into the meeting as they join. Alternative hosts can be assigned to admit participants.
Remove Unwanted Participants
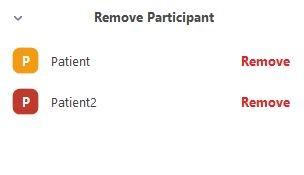
Option 1
- Select the Security icon
- Select "Remove Participant"
- From the Remove Participant menu, select "Remove" for the participant you wish to remove from the meeting
Option 2
- Select the Participants icon from the Zoom Meeting Toolbar
- Move your cursor to highlight the participant you wish to remove
- Once highlighted, select, “More>” icon
- From the drop-down menu, select "Remove"
Suspend Participant Activities
When selected, participants within the meeting will have their video and audio turned off, screen sharing will stop and the meeting will be locked.
- Select "Security" from the Zoom Meeting Toolbar
- Select "Suspend Participant Activities"
- A dialog box will appear with the question, “Suspend all participant activities?”
- Select "Suspend"
Disable a Participant's Video Camera
- Select "Participants" from the Zoom meeting toolbar
- Highlight the participant name
- Select "More"
- From the drop-down menu, select "Stop Video"
- Select "Stop Video"
How to Mute a Participant
- Select "Participants" icon from the Zoom meeting toolbar
- Highlight the participant
- Select "More"
- Select "Mute"
Mute All Participants
- Select "Participants" from the Zoom meeting toolbar
- At the bottom of the Participant window, select the “Mute All” button
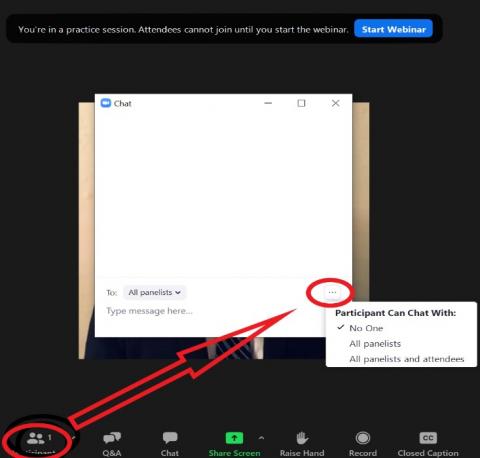
Disable Chat Within a Zoom Meeting
- Select the "Participant" icon from the Zoom meeting toolbar
- Select the three dots to view additional options
- Select "No one"
Webinar Security Settings
Zoom Webinars are like a virtual lecture hall or auditorium. By design are more secure than meetings as attendees cannot be seen or heard unless allowed by the host/co-host. Webinars are ideal for large audiences or events that are open to the public.
Zoom Webinar Licences
UCSF IT has a pool of licenses for occasional use, or if you need Webinar capability often, you may purchase a webinar license. (MyAccess Login required)
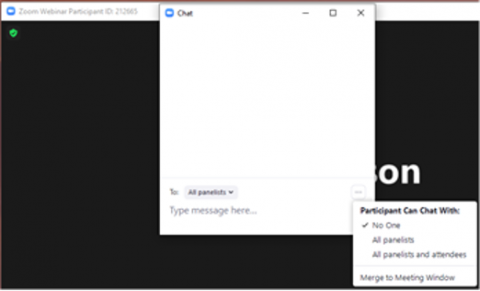
Disable Chat Within a Webinar
Webinars are by design more secure than meetings.
- Select the "Participant" icon from the Zoom meeting toolbar
- Select the three dots to view additional options
- Select "No one"
Disable Participant Chat from Q&A
- Select Q&A from the Zoom Webinar toolbar
- Select the gear icon located in the upper-right corner
- From the drop-down menu, select “answered questions only”
- Once selected, only panelist will be able to see comments submitted in the Q&A
- Owning Team: IT Security
-
Team Lead: Patrick Phelan