Zoom Frequently Asked Questions
The following are some Frequently Asked Questions you may have when using Zoom in your work at UCSF:
How do I start an instant meeting?
Why can't I see my meetings in the Zoom desktop app?
How do I set a virtual background?
How do I assign an alternative host to my Personal Meeting Room?
What is Zoom Live Transcription?
How do I create a Zoom account?
- Sign in using your MyAccess username and password to create an account and start using Zoom.
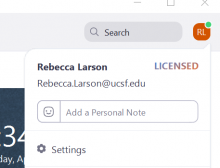
How do I change my preferred name in zoom?
- Sign in to the Zoom desktop client.
- Click your profile picture, then select Settings.
- Select Edit My Profile.
- Your profile will open in a new browser window.
- Select Edit next to your Name.
- Enter the Desired Display name.
- Click Save to update your name in Zoom.
How do I add Pronouns to my Zoom profile?
- Sign in to the Zoom desktop client.
- Click your profile picture, then select Settings.
- Select Edit My Profile.
- Your profile will open in a new browser window.
- Select Edit next to your Name.
- Enter your pronouns in the Pronouns field.
- Click Save to update your pronouns in Zoom.
How do I use Zoom AI Companion?
Zoom AI Companion acts as your generative-AI digital assistant to deliver powerful, real-time capabilities to help users improve their productivity and work together more effectively. Zoom AI Companion is included at no additional cost to UCSF users with the services assigned to their Zoom user accounts. Learn more about using Zoom AI Companion.
Where do I get Zoom?
How do I schedule a meeting?
- Schedule from a web browser:
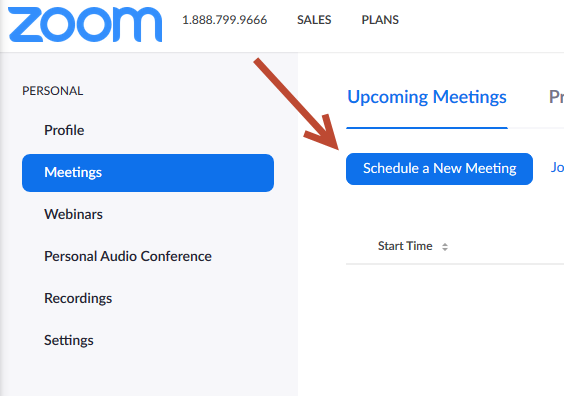
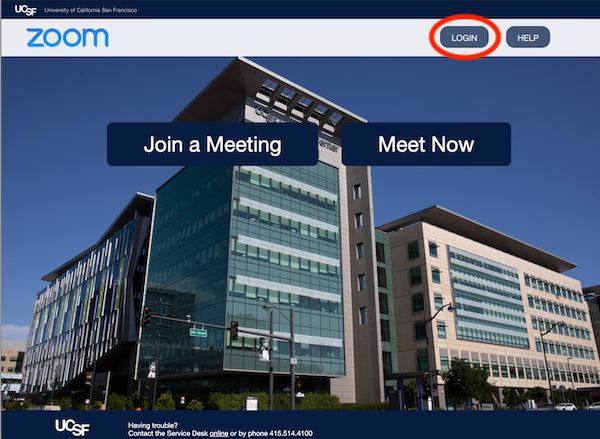
- Navigate to ucsf.zoom.us and select Login at the top right.
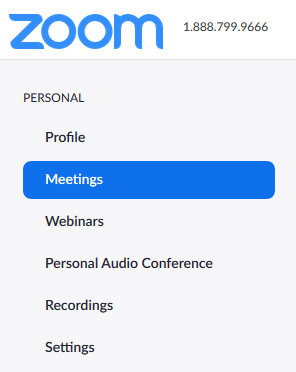
- Select Meetings from the left pane.
- Select the Schedule a New Meeting button.
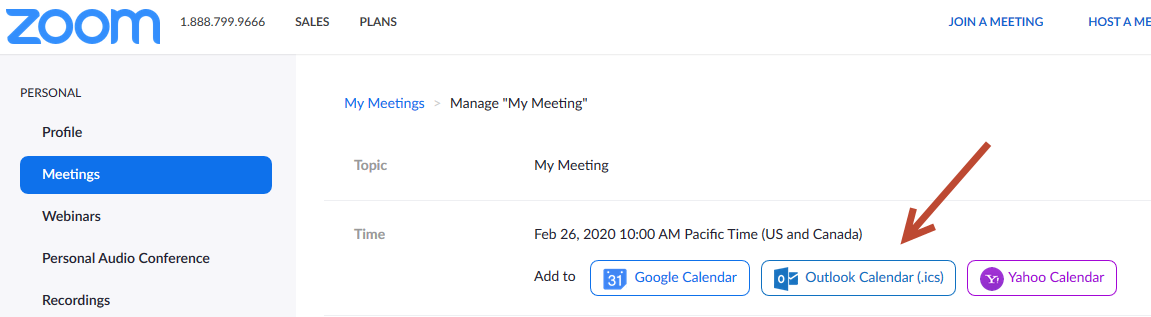
- Enter your meeting details.
- Select Save.
- To invite attendees to the meeting, select Outlook Calendar (.ics) and forward the meeting information to desired attendees.
- Schedule within Outlook:
1. From the Home tab of Outlook, select New Items> Meeting.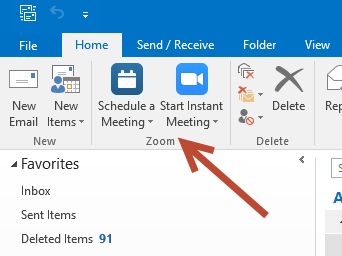
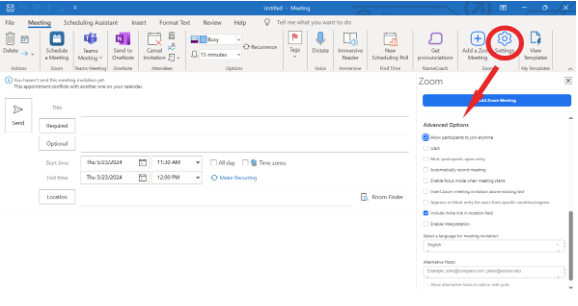
2. From the Meeting tab, select Settings (e.g., Gear icon)
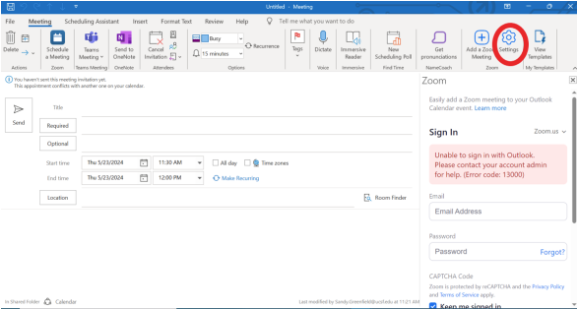
3. If you aren’t already signed in, scroll down to click on the SSO button
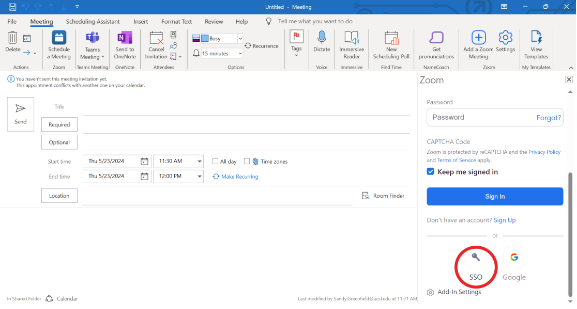
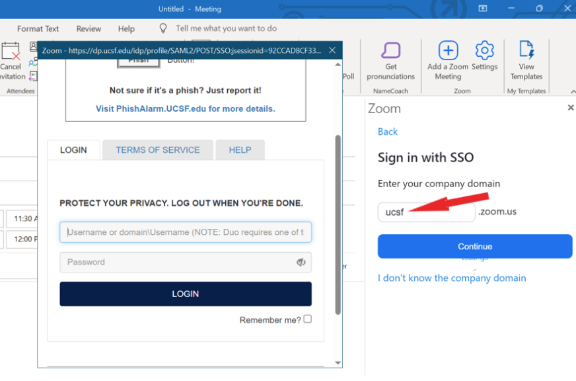
4. In the Company Domain field, type UCSF if it isn’t already populated. Click Continue, then sign into the MyAccess window.
5. After signing in, note that you can choose between scheduling a meeting with a randomly generated Meeting ID or your Personal Meeting ID, which doesn’t change.
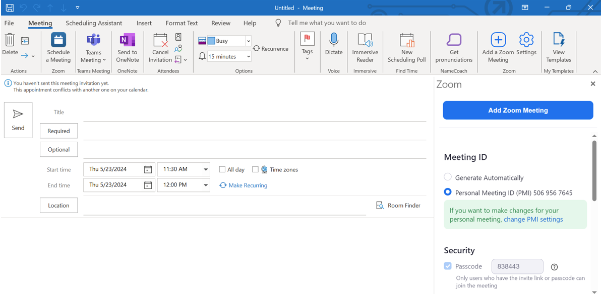
NOTE: Scroll down to view Advanced Options, including adding Alternative Hosts among other options.
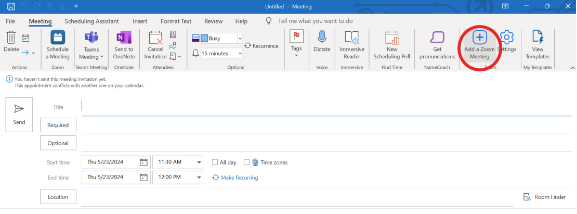
6. Moving forward, simply select Add a Zoom Meeting without needing to select Settings each time.
7. Selecting Add a Zoom Meeting will automatically populate the meeting invite as shown below:
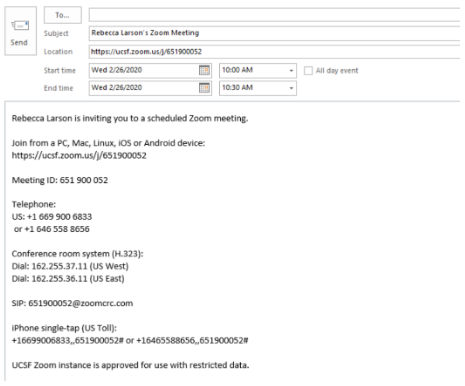
8. Add any additional necessary information to the meeting invite and forward it to the attendees.
How do I start an instant meeting?
- From a web browser:
- Navigate to ucsf.zoom.us and select Host A Meeting. Log in using your MyAccess credentials.
- Join with either (1) computer audio or (2) via a phone call.
- Select attendees using the Invite button in the meeting toolbar.
- From Outlook:
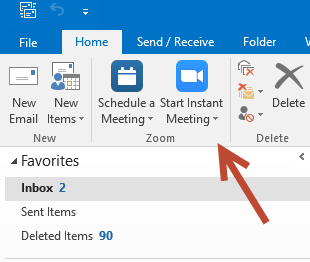
- From the Zoom pane of Outlook, select Start Instant Meeting.
- Choose to start the meeting with or without video.
- Select attendees using the Invite button in the meeting toolbar
- From Zoom Desktop App:
- Select New Meeting option
NOTE: This will open your Personal Meeting Room, which is a static meeting ID which doesn’t change.
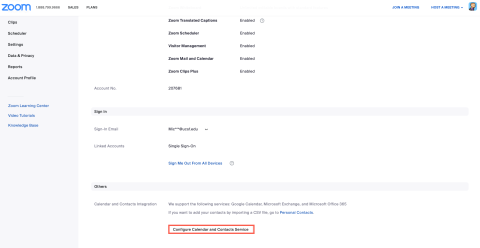
Why can't I see my meetings in the Zoom desktop app?
1. Sign into myaccess.ucsf.edu, scroll down to Zoom before clicking LOGIN, then click on Profile at the top left. Scroll down to click on Configure Calendar and Contacts Service:
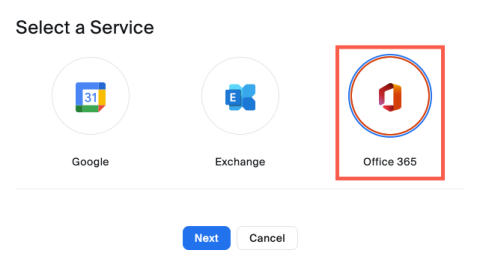
2. Click Office 365 then Next:
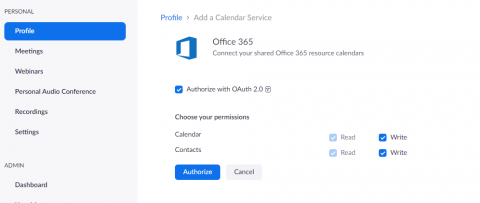
3. From the Profile > Add a Calendar Service screen, select the Authorize option.
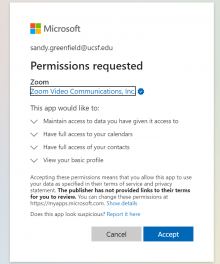
4. When prompted, sign in with your UCSF email and password.

5.. After the Permissions Requested screen loads, select the Accept button.
6. Your scheduled meetings should show up in your Zoom desktop app.
NOTE: Recurring meetings appear at the very bottom of the meeting list.
How do I Join a meeting?
- From a web browser:
- Visit ucsf.zoom.us.
- Navigate to ucsf.zoom.us and select the Join a meeting option.
- Enter the Meeting ID your host provided and your name, if prompted.
- Click Join.
- From Outlook:
- Open the Outlook calendar invite and select the Join from PC, Mac, Linux... link.
- The Zoom desktop application will automatically open.
NOTE: If you do not have Zoom installed, please load it from the Zoom download page.
Recommended Zoom meeting tips
Tips for hosts of meetings
- Set expectations ahead of time
Let participants know ahead of time if your expectation is for them to be joining by video or if audio-only is fine. - Get participants engaged during the meeting
Be mindful of who's spoken and who has not, and call on people to ensure that everyone is participating equally.
Tips for hosts and attendees
- Turn on your camera
Turning on your camera can help encourage others to do the same, and it helps boost meeting engagement as a result. - Wear headphones
Wearing headphones improves your own experience of hearing others in the meeting, and it also improves the experience for everyone else. This is because it prevents feedback and echoing that can occur when participants must continually mute and unmute their microphones. - Be mindful of ambient noise
Keep your microphone on mute if you aren't talking. Be aware that noises that may seem quiet to you might sound much louder to those joining the meeting remotely.
Tips for stepping it up a notch
- Use Zoom tools for more robust and engaged participation
Whiteboards can be used for brainstorming and grouping ideas. If you haven’t used Zoom’s whiteboard feature before, check out the Zoom whiteboard guide. Zoom also has a helpful tutorial on the whiteboard annotation tools. - Orient people to the tools you’ll be using
Spend time at the beginning of the meeting to orient everyone to any tools being used (e.g., Screen sharing or writing on whiteboards) during the call. - Harness the power of group work
For meetings with more than five participants, group work can be more engaging and effective, as it allows groups to tackle different challenges before returning to the group to share what they have accomplished. - Organize breakout groups ahead of time
Zoom allows you to presort participants into breakout rooms. Review Zoom’s guide to Pre-assigning participants to breakout rooms for insight into using breakout rooms and watch this video for best practices for running breakout rooms in Zoom. - Check and adjust
It is a good end-of-meeting best practice to reflect on what went well and what could have gone better. Set aside the last five minutes of a meeting to check in with participants and get their feedback.
How do I record a meeting?
- To record a meeting in Zoom, connect your audio within the meeting before selecting Record from the meeting toolbar. You have the option to either record locally to your computer or the Cloud. If you record your meetings locally, the recording can be accessed the Zoom subfolder appearing in your computer's Documents folder.

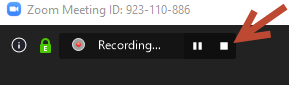
- To stop recording, select the Stop Recording button (e.g., Square) in the upper left portion of the Zoom meeting window
- If you choose to record locally, Zoom will convert the recording after the meeting ends. Please be sure to let the conversion finish before joining another Zoom meeting, or your recording will become corrupted.
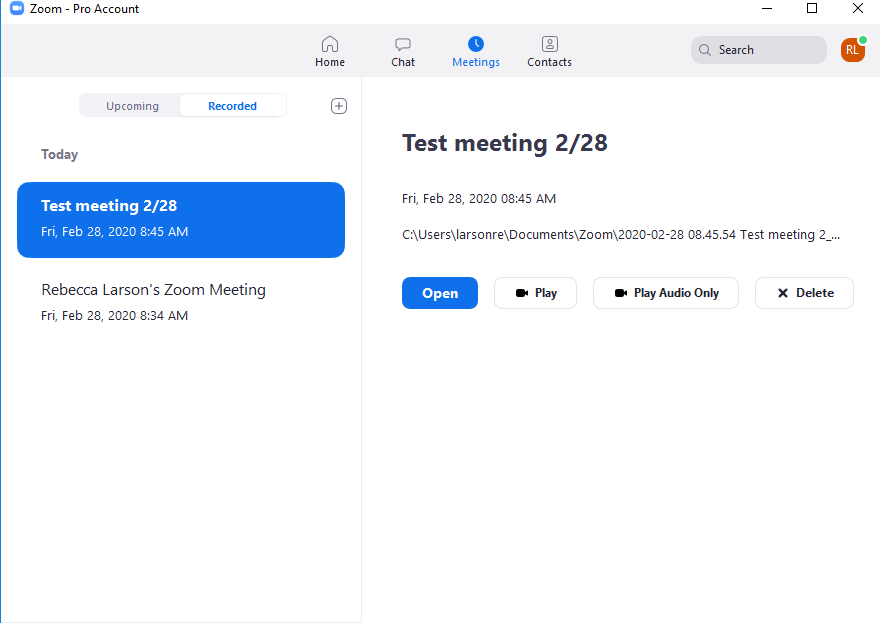
NOTE: You can access your meeting recordings from the Zoom desktop client by selecting the Meetings tab then the Recorded option.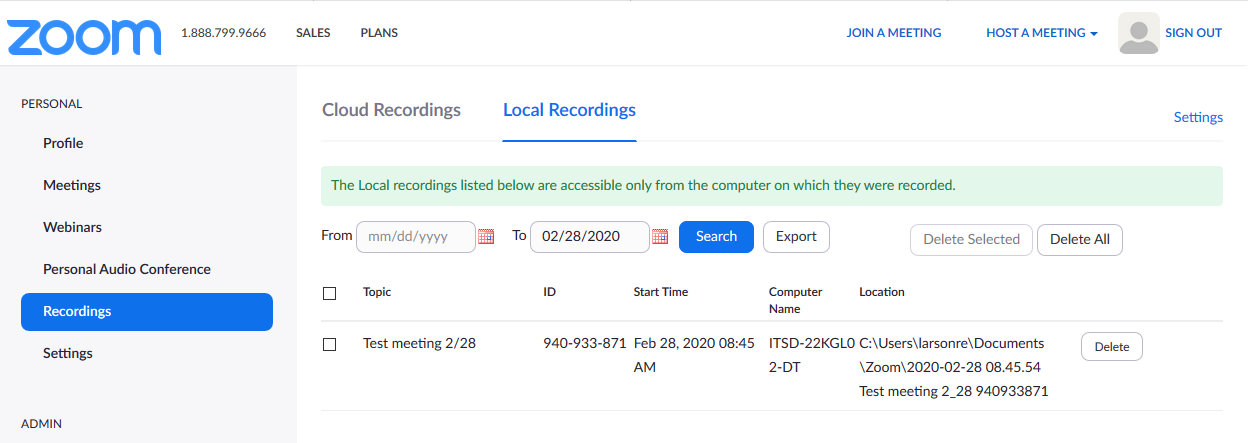
- To access your cloud recordings: navigate to ucsf.zoom.us and select the Recordings tab to view your Cloud Recordings as well as the location of your Local Recordings.
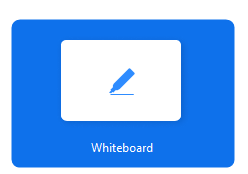
How do I share a whiteboard?
NOTE: Since Zoom Whiteboards cannot be saved, it is encouraged to take
- From the meeting toolbar, select the Share Screen option.

- Select the Whiteboard tile from the available options.
- The annotation tools will appear automatically, but you can select the whiteboard option in the meeting controls to show or hide them.
- Use the page controls in the bottom-right corner of the whiteboard to create new pages and toggle between pages.

- When you're finished, click Stop Share.

How do I set a virtual background?
1. Open your Zoom Desktop app, then click on the gear wheel in upper right corner.
2. Choose Background & effects.
3. Choose your desired virtual background or click the plus button to upload your own.
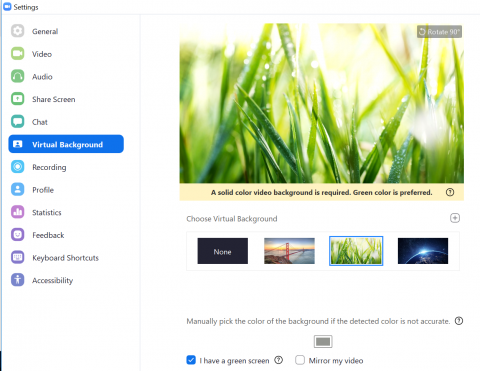
NOTE: If you would like to use a UCSF Zoom virtual background, review the available options.
How do I assign an alternative host to my Personal Meeting Room?
If you need someone to be able to start and record meetings, you can assign an alternative host.
- Navigate to https://ucsf.zoom.us and select LOGIN in the top right.
2. Select the Meetings option under the Personal heading.
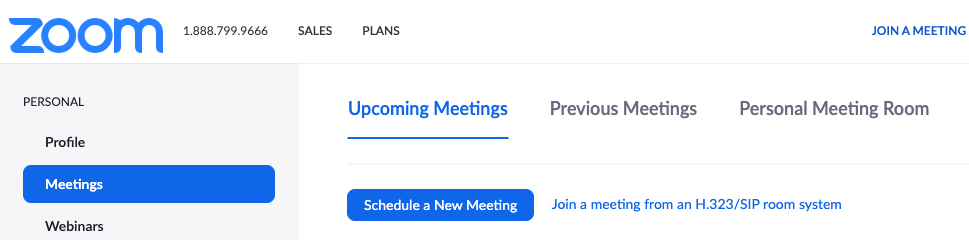
3. Select your Personal Meeting Room.
4. Scroll to the bottom of the page and select on Edit this Meeting option.

5. Enter the email addresses of the individuals to be added as Alternative Hosts. NOTE: Be sure to comma-separate each email address, if you are adding more than one alternative host.
