Phones
UCSF prefers employees use a department-provided cell phone or a Jabber softphone. Learn more about Jabber.
As of July 2024, monthly phone lines are funded centrally by UCSF IT. This means phone line costs are no longer the responsibility of departments or individual staff. The centrally funded services include the devices and phone lines associated with Jabber softphones, desk phones, elevator phones, life safety phone lines, blue pole phones located on campus, red emergency phones. Devices and phone lines not covered centrally include Voalte, mobile devices, and pagers.
No. Departments remain responsible for ongoing management of phone numbers assigned as primary or main department lines, to individuals, and to any other shared lines.
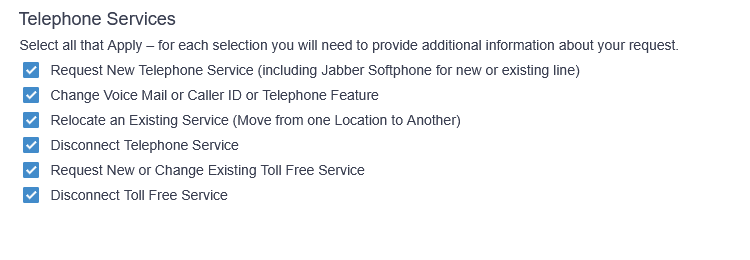
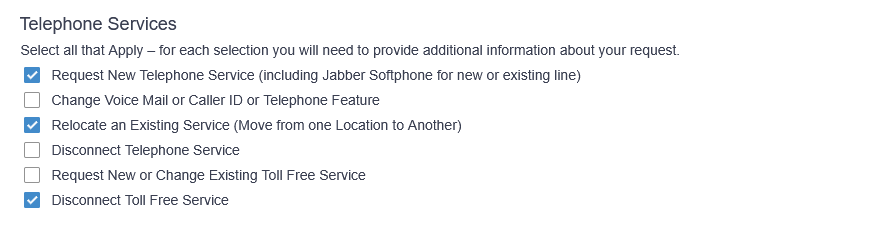
Yes. You can check multiple boxes (request multiple services) on the same request form. See examples below:
Example 1
Example 2
Yes. First select all applicable services on the form. The next screen will allow you to select each service for one or multiple users. See example below:
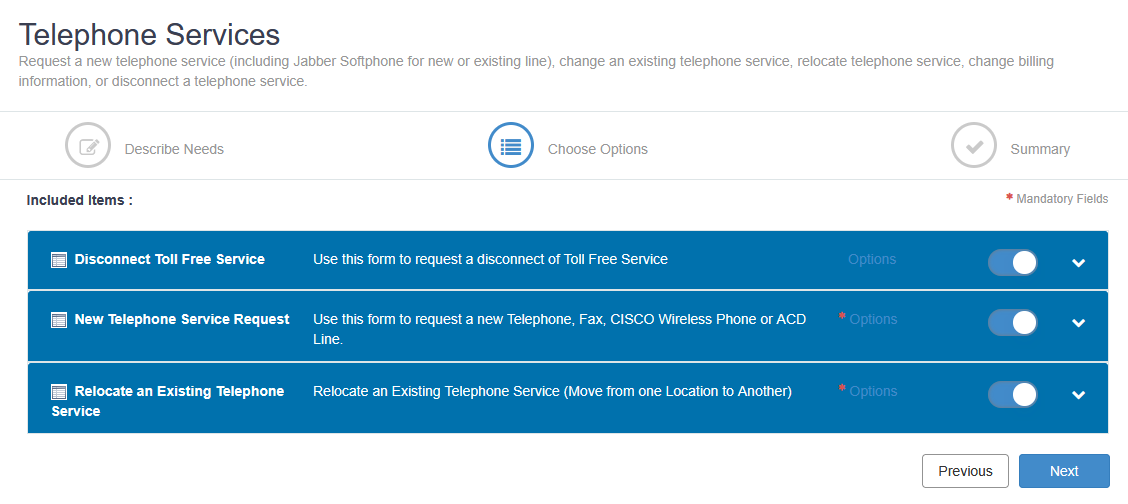
Expand the item by selecting the down arrow, then click Add.
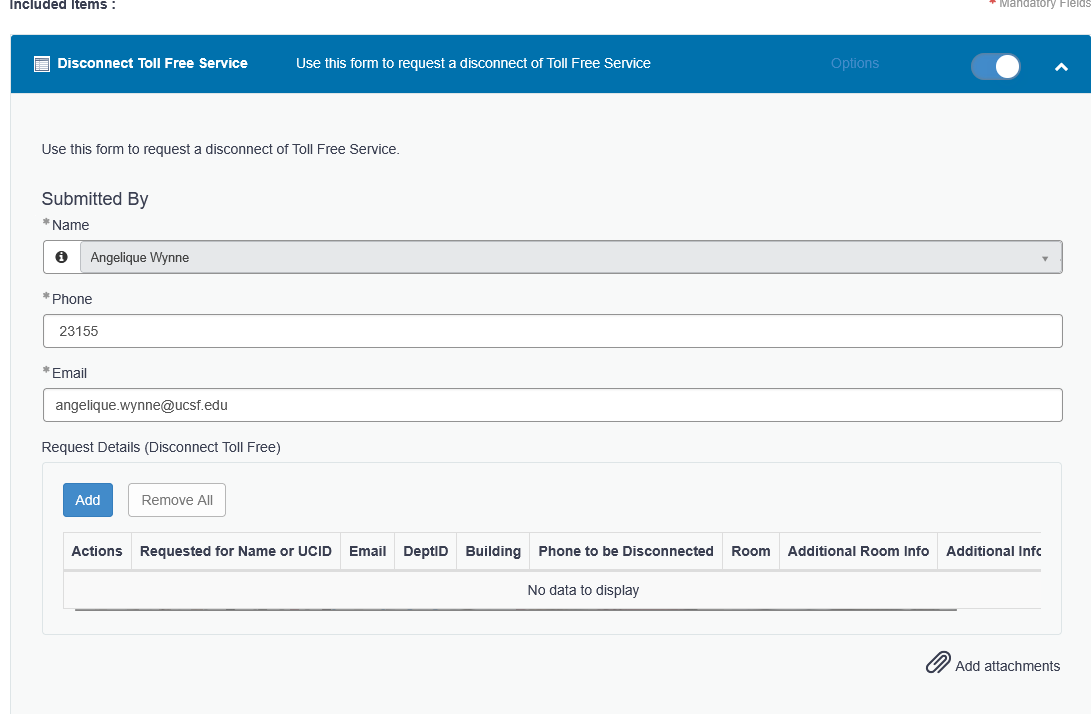
Fill in all required (*) information and any additional helpful information, then click Add again.
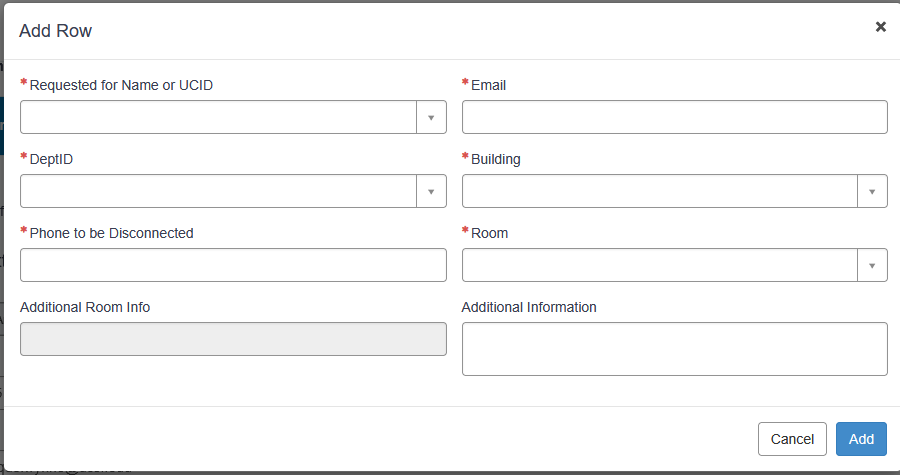
You will add a line item for this service. Add additional rows as needed by clicking Add under the specified service.
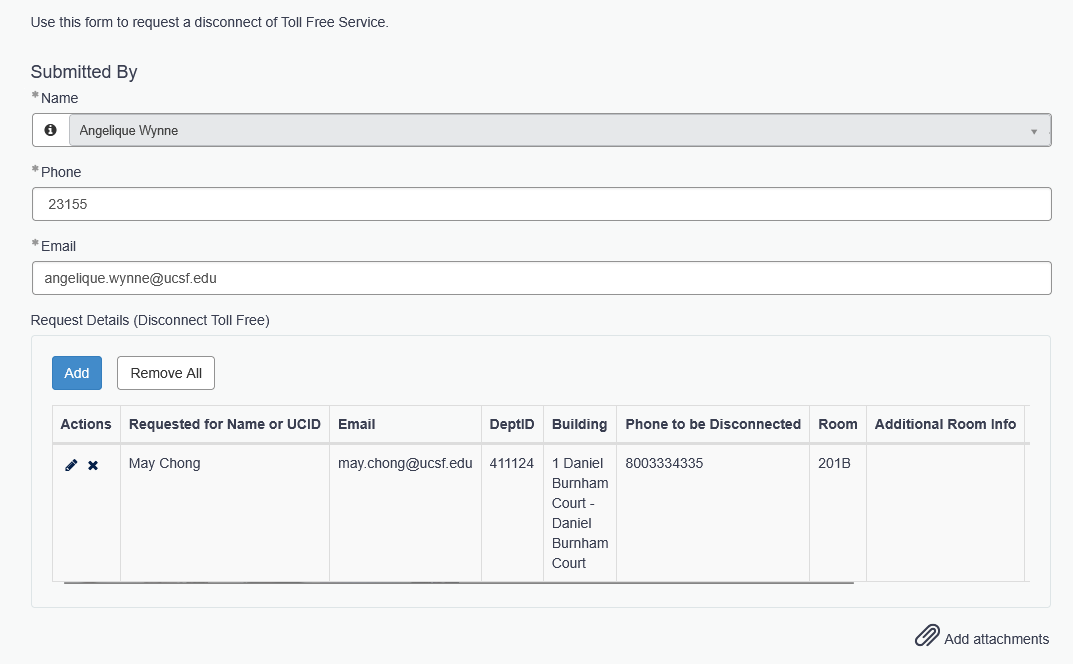
Once all service requests have been filled out, click Next at the bottom of the page to submit your request(s).

UCSF Telephone Services supports the Jabber softphone application and your Jabber phone number only. Personal or UCSF-provided cell phone numbers are not supported.
If your Jabber app is working on your mobile device and you can make and receive calls within the Jabber app, it is likely connected via Wi-Fi or cellular data and functioning as designed. Issues related to your actual cell phone number, mobile carrier service, or mobile plan are not supported by UCSF Telephone Services.
For assistance, please contact the IT Service Desk at 415-514-4100.
Contact your department or the IT Service Desk at 415-514-4100.
You can reset your voicemail PIN yourself as long as your voicemail is assigned to your UCSF username. This applies to Cisco desk phone and Jabber softphone voicemail only. It does not apply to the BCH Oakland voicemail system.
NOTE: This process does not apply to:
- BCH Oakland voicemail system. Report a BCH Oakland telecom issue by completing this form.
- Nortel-Avaya phones. For those phones, a ticket must be submitted.
Nortel/Avaya locations:- 900 Hyde Street, San Francisco
- 909 Hyde Street, San Francisco
- 1199 Bush Street, 1st floor, San Francisco
- 1777 Botelho Drive, suite 110, Walnut Creek
If you are able to reset your PIN using one of the options below, then your UCSF username is correctly associated with your voicemail box. Your UCSF username is typically the same username you use to log in to your computer. If this is a shared voicemail associated with a shared department email then you will need to have the username associated with that email address and access to the shared email account.
NOTE: This process does not apply to:
- BCH Oakland voicemail system. Report a BCH Oakland telecom issue by completing this form.
- Nortel-Avaya phones. For those phones, a ticket must be submitted.
Nortel/Avaya locations:- 900 Hyde Street, San Francisco
- 909 Hyde Street, San Francisco
- 1199 Bush Street, 1st floor, San Francisco
- 1777 Botelho Drive, suite 110, Walnut Creek
Option 1: Voicemail portal (Recommended)
Visit https://voicemail.ucsf.edu/ and log in with your UCSF credentials. You may be prompted to log in twice. Follow the on-screen instructions to reset your PIN.
Option 2: Reset by phone
- Call 415-514-8810.
- Enter your MB#/ID:
- Stanyan Hospital users: Full 10-digit MB#/ID
- All other users: Last 5 digits of your MB#/ID
- Press 1 to confirm your extension.
- A temporary PIN will be sent to the email address associated with your voicemail box. Note: This option only works if your voicemail account has a valid email address on file.
If you are unable to reset your PIN using the options above, please contact the IT Service Desk for assistance.
Find additional information in the voicemail set up frequently asked questions or all voicemail FAQs.
NOTE: This process does not apply to:
- BCH Oakland voicemail system. Report a BCH Oakland telecom issue by completing this form.
- Nortel-Avaya phones. For those phones, a ticket must be submitted.
Nortel/Avaya locations:- 900 Hyde Street, San Francisco
- 909 Hyde Street, San Francisco
- 1199 Bush Street, 1st floor, San Francisco
- 1777 Botelho Drive, suite 110, Walnut Creek
Submit a request when you are asking for a new service, a change to an existing service, or access to a feature you do not currently have (e.g., a new Jabber softphonesetup, call forwarding changes, or a phone move).
Submit a repair ticket when something that was previously working is no longer functioning as expected (e.g., you cannot make or receive calls and you were able to before, voicemail is not working and it’s assigned to you, or your Jabber app will not connect).
Headsets
IT does not provide, purchase, or support headset hardware. You may purchase a headset from a vendor of your choice. Before purchasing, make sure the headset is compatible with the phone, computer, and applications you use.
Important: IT will not replace or upgrade your Cisco desk phone because a purchased headset is not compatible with it.
Choose a headset based on how you make and receive calls.
Cisco Jabber
Cisco Jabber softphone is the preferred telephone communication option at UCSF. Because Jabber runs on your computer, you can use a compatible:
- USB headset
- Bluetooth headset
- 3.5 mm headset
A basic wired USB headset with a microphone is often the easiest option.
Zoom
Zoom also runs on your computer and generally works with the same types of headsets as Jabber:
- USB headset
- Bluetooth headset
- 3.5 mm headset
If you regularly use both Jabber and Zoom, consider purchasing one headset that is compatible with both applications. Note: IT can provide USB headsets for use with computers. Click here to request a USB headset.
Cisco 7841 desk phone
The Cisco 7841 uses a wired headset connected to the headset port on the phone. When purchasing a headset, look for one that specifically lists compatibility with the Cisco 7841 or Cisco 7800 Series. Bluetooth headsets do not connect directly to a Cisco 7841 phone.
Cisco 8851 desk phone
The Cisco 8851 supports compatible wired and USB headsets. Always check the headset manufacturer's compatibility information before purchasing.
If you want to use one headset with multiple devices or applications, make sure it is compatible with all of them before purchasing.
For example, if you use Cisco Jabber + Zoom + Cisco 7841 desk phone, your headset and any required cables or adapters need to be compatible with all three.
A Bluetooth headset may work with Jabber and Zoom on your computer, but it will not connect directly to a Cisco 7841 desk phone.
Please remember: IT will not replace or upgrade your Cisco desk phone because a headset you purchased is incompatible with it.
- Connect your headset to your computer.
- Open Zoom.
- Go to Settings > Audio.
- Under Speaker, select your headset.
- Under Microphone, select your headset's microphone.
- Use Test Speaker and Test Microphone to make sure everything is working.
If you use Genesys and are having trouble with your headset, speaker, microphone, or audio settings, please review the Genesys audio setup and troubleshooting instructions.
Try these quick steps to see if you can resolve your issue:
- Make sure your headset is securely connected.
- If you are using Bluetooth, make sure it is paired and connected to your computer.
- Make sure your headset is turned on and not muted.
- Check the headset volume.
- Close and reopen Jabber, Zoom, or the application you are using.
- Make sure the correct headset is selected for both the speaker and microphone.
- If it still isn't working, disconnect and reconnect the headset.
You can also check your computer's sound settings:
Windows:
Go to Settings > System > Sound and make sure your headset is selected for both Output and Input.
macOS:
Go to System Settings > Sound and make sure your headset is selected for both Output and Input.
Still need help?
If you have tried the steps above and still need assistance, contact the IT Service Desk for support.
Call: 415-514-4100
Submit a ticket: help.ucsf.edu
The IT Service Desk can help remotely check your headset connection, computer audio settings, and application settings. IT support can also help verify that your headset is properly connected and configured with UCSF-supported computers, Cisco phones, Jabber, Zoom, and other supported applications.
If the issue cannot be resolved remotely, the IT Service Desk can assign your ticket to a Desktop Field Services technician for onsite assistance.
IT does not support the headset hardware itself. If the problem is with the headset hardware, or the headset requires manufacturer-specific troubleshooting, you may need to contact the headset manufacturer or vendor for assistance.
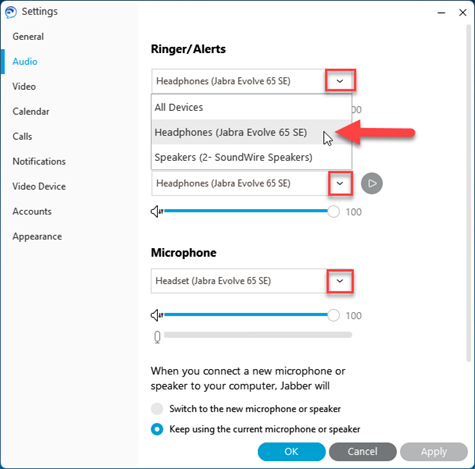
To set up you headset so it's able to be used to make and receive calls with Jabber, follow these instructions:
1. Click the gear icon in the upper-right corner. Select Settings.
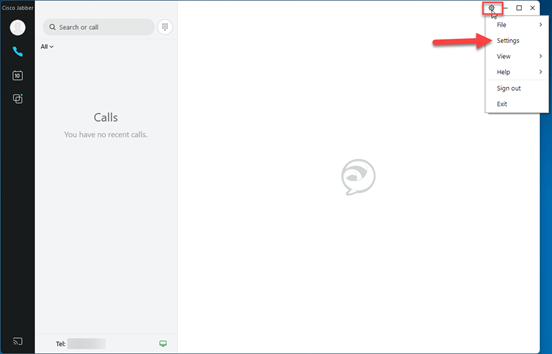
2. Click on the Audio tab.
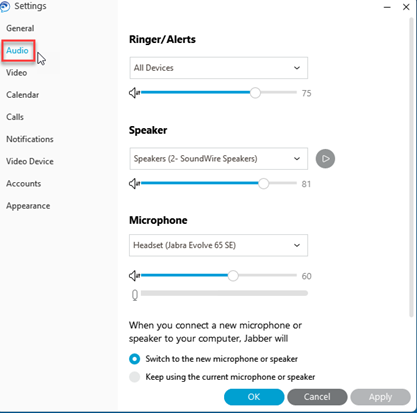
3. Click on the dropdown menu and select your desired audio device. Do this for each of the audio input/output sections.
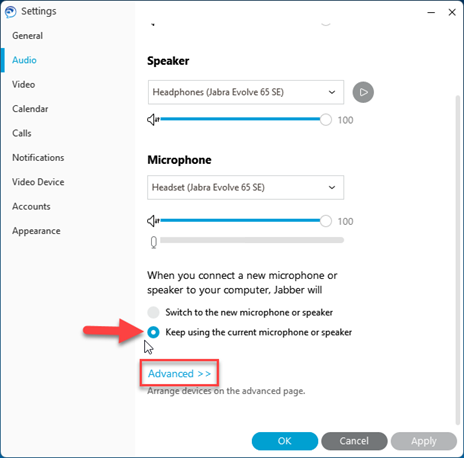
4. Once your desired audio device is selected, scroll down, and ensure the “Keep using the current microphone or speaker” option is selected. Then click on Advanced >>.
5. To move the desired device as the default device, select the device and use the arrow button to move it to the top of the list. Do this for each of the audio input/output sections.
6. Click Apply to save the changes.
7. Click Ok to exit.
Note: These settings will remain the default until your headset, input/output device, or computer changes. If your Jabber is reset, you will need to reconfigure the audio settings using the steps above.