Overview
FireEye installation instructions with the required user actions for users of Macs that are not enrolled into Jamf Pro at UCSF.
These instructions are viewable on your mobile device by scanning this QR code:

Installing FireEye Endpoint Security on Macs
*** IMPORTANT NOTES ***
- For Macs that are not actively enrolled in UCSF's Jamf Pro, you MUST follow these instructions to complete the installation of FireEye and activate security protection. A successful installation of FireEye does not mean it is fully activated if certain components were not allowed to run by you, following installation.
- FireEye is automatically installed as part of BigFix and Jamf. There is no need to download and run a separate installer for FireEye.
- FireEye is part of UCSF's minimum security standard for all computers that connects to any UCSF's campus or health networks regardless of whether confidential data is involved or not.
- A system restart is not required for new installations.
- A system restart IS REQUIRED when updating FireEye from an older version.
- More details about FireEye is available on this website: https://security.ucop.edu/services/threat-detection-and-identification/edr-overview.html
Step-by-step instructions if prompted to install or update FireEye on your Mac
NOTE: Our FireEye installer will open these instructions automatically for you to take these required actions to complete installation of FireEye if your computer isn't enrolled and managed in UCSF's Jamf Pro.
- If prompted by BigFix to install or update FireEye on your Mac, please respond accordingly by clicking Take Action in the BigFix window to begin.
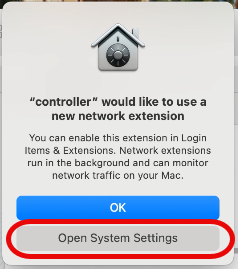
If this dialog appears, click Open System Settings.
- Follow the instructions below depending on the macOS version running on your computer:
Click here for macOS Sequoia or Tahoe
Click here for macOS Ventura or Sonoma
IMPORTANT: Failure to allow the FireEye extension to run as required will cause the FireEye installer to be stuck, preventing your computer from restarting or shutting down. This is a function by design.
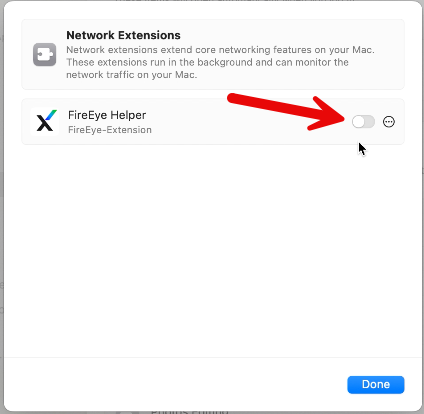
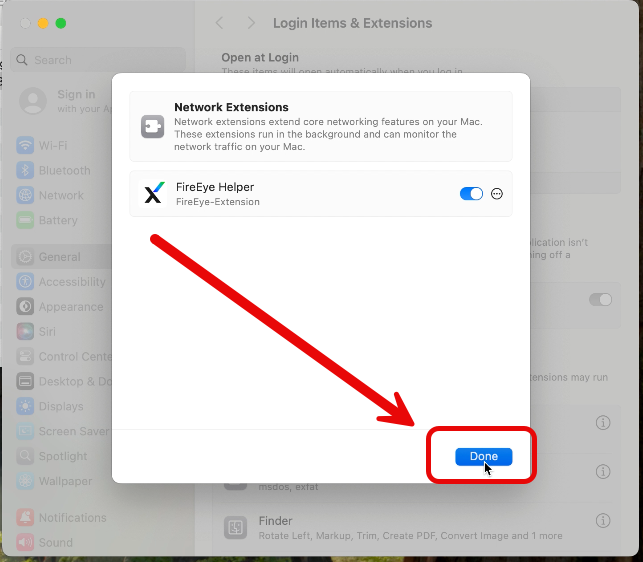
macOS Sequoia (15.x) or Tahoe (26.x)
The Network Extensions settings window will open as shown below. Click on the on/off switch (indicated by the red arrow shown in the example below) to enable FireEye Helper. This is required for FireEye to detect cyber attacks on your computer.
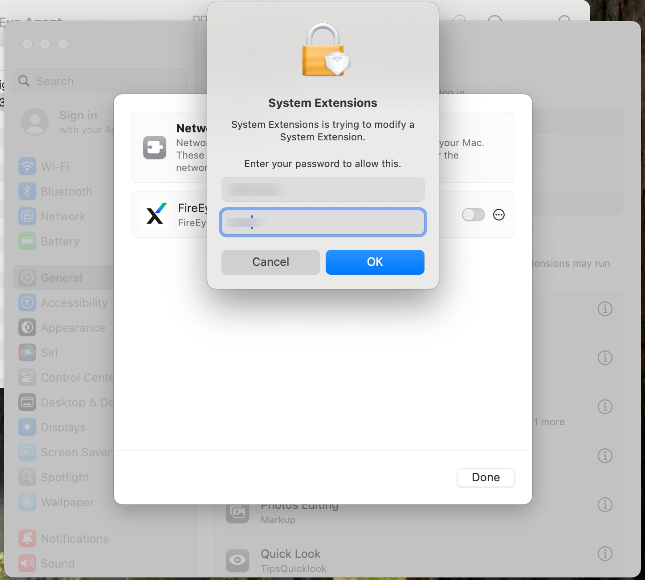
When prompted to enter your computer's password to apply the setting change from the previous step, please do so.
When the following prompt appears, click Allow to allow FireEye Helper to enable the network content filter that is intended to catch any potential cyber attacks on your computer, including malware.
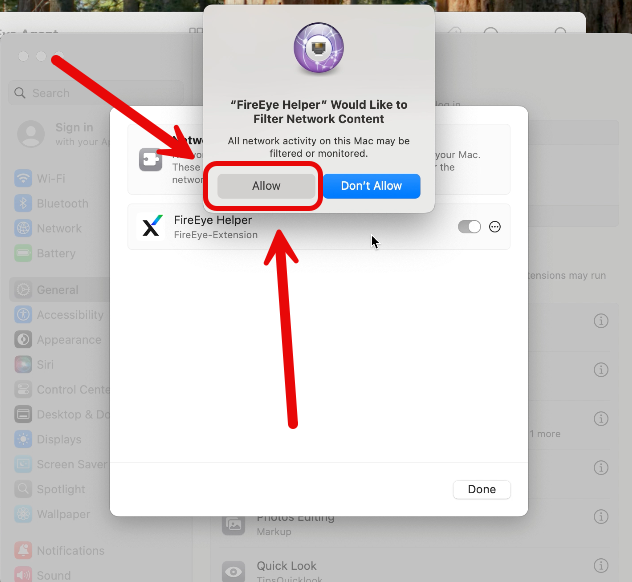
Then click Done.
Click here to skip ahead when done.
macOS Ventura (13.x) or Sonoma (14.x)
The Privacy & Security settings window from System Settings will open as shown below. Click Allow to authorize FireEye Helper to run on your computer. This is required for FireEye to detect malicious digital threats that may enter your computer from the Internet.

When prompted to unlock Privacy & Security settings on your computer, type in your computer's password and then click Unlock to continue on.

When the following prompt appears, click Allow to allow FireEye Helper to enable the network content filter that is intended to catch any potential cyber attacks on your computer, including malware. 
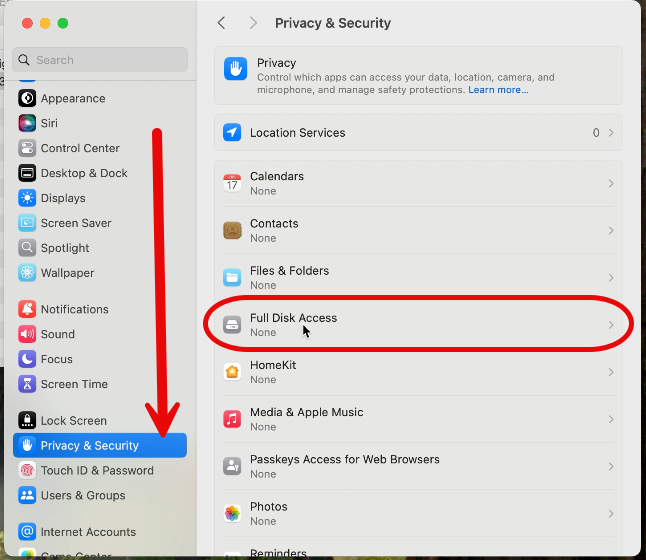
Grant Full Disk Access to FireEye (all macOS versions)
In System Settings, find and select Privacy & Security, then open Full Disk Access
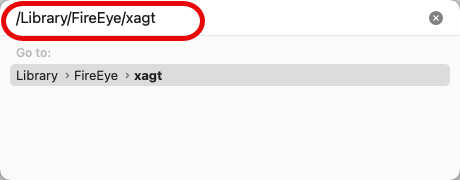
While keeping the Full Disk Access window open, go to the Finder and press Shift-Command(⌘)-G on your keyboard. In the "Go to:" dialog (example shown below), type in /Library/FireEye/xagt and then press Enter or Return on your keyboard.
The xagt folder should open with 3 items as shown below:
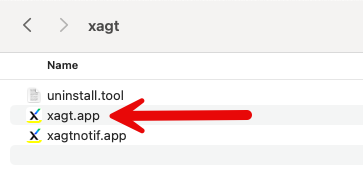
Click and drag xagt or xagt.app into the Full Disk Access window anywhere above the + - buttons. If prompted to enter your computer's password to allow this settings change, please do so. Ignore the other two items in that same folder.
After following all the above steps exactly as prescribed, CONGRATULATIONS! You have successfully enabled this important threat detection and identification (TDI) tool that helps the entire University of California reduce cyber security risk to their networks and to your computer as well.
Additional Information
To ensure FireEye doesn't cause error messages, do not move any FireEye or xagt files or folders to anywhere other than where they were originally installed.
The FireEye Helper icon in the Applications folder will appears as any of the following shown below, which you should ignore:

FireEye Helper automatically runs as a system extension when you turn on or restart your computer and is not intended for users to double-click on.