Jump straight to enrollment instructions
What is a BYOD Mac?
"Bring Your Own Device" or BYOD refers to being allowed to use your personally owned device for UCSF business rather than being required to use an officially provided device under UCSF's ownership. BYOD's may also apply to devices owned by other business organizations that authorized you to use, whether for business or personally, at UCSF.
What is Jamf Pro?
Jamf Pro is a comprehensive management system that UCSF IT Field Services (ITFS) uses to manage the entire lifecycle of many UCSF Macs, particularly for deploying and maintaining supported software, distributing settings, enforcing security configuration, analyzing inventory data and assisting with responding to security threats. It is now expanded to include all Macs used at UCSF, including Macs not owned by UCSF but used for UCSF business. To learn more about Jamf Pro at UCSF, visit our FAQ page at https://wiki.library.ucsf.edu/x/01r_Hw (VPN is required to view if not on the UCSF network).
Why enroll your BYOD Mac computer into Jamf Pro at UCSF?
To protect UCSF data we all have to comply with minimum security standards. On Macs, this means installing required security tools described in https://it.ucsf.edu/how-to/ucsf-it-security-suite and allowing permissions for required kernel or system extensions, disk access and content filters to run on macOS. By enrolling your BYOD Mac into Jamf Pro, the official Mobile Device Management (MDM) solution for Macs at UCSF, we will manage these required software permissions for you to help your computer stay compliant.
What does Jamf Pro enrollment entail?
Prerequisites: Most importantly, your BYOD Mac cannot be actively enrolled onto another MDM solution that is not managed by UCSF IT. You must also have an active UCSF email account that is enrolled in Duo in order to complete the Jamf Pro enrollment.
Enrolling your Mac involves downloading and running an installer file from "Disk Encryption - macOS Encryption" at https://it.ucsf.edu/software. It will check your computer to determine if it can enroll into Jamf Pro at UCSF and will direct you to the appropriate steps. Once your Mac enrolls into Jamf Pro successfully, procedures to get your computer compliant with our required security tools will begin.
Are enrollment policies for UCSF-owned Macs and BYOD Macs the same?
No they are not. Your personal UCSF email address will default to enrolling your Mac into the BYOD site in Jamf Pro. The system will verify the serial number of your computer with Apple School Manager to determine if it is UCSF-purchased or not and will proceed accordingly.
What happens if I don't enroll my BYOD Mac into Jamf Pro at UCSF?
There are some valid cases when your computer cannot enroll into Jamf Pro, such as if your computer belongs to another organization that they're already managing with their own MDM solution. In such cases, the installer will still install BigFix, FireEye and ForeScout SecureConnector and you will be required to manage security software permissions on your computer manually. If your computer is running macOS Big Sur or newer, you will also be required to file your proof-of-encryption with your FileVault personal recovery key. Visit this page for more information about our proof-of-encryption process: https://it.ucsf.edu/service/proof-encryption
How do I enroll my BYOD Mac at UCSF?
IMPORTANT: If your Mac is UCSF-owned, please contact your IT support group first as these enrollment instructions do not apply to UCSF-purchased Macs. Some departmental IT's may require different provisioning of your Mac.
Download the Installer File
- Navigate to software.ucsf.edu.
- Search for Disk Encryption - macOS Encryption to download and save the installer onto your computer.
- Find and double-click on UCSF-Jamf-Enrollment-Mac-BYOD.pkg that you just downloaded.
- Read through the introduction screen and click Continue.

- Read through the next screen and click Continue

- The next screen describes some important information that we ask for your agreement. Please read through them and click Continue

- You will be prompted to agree or disagree to the information security policies and privacy statements provided in the License section of our installer. Please respond to the prompt.

- If you click Agree in the previous step, this next screen will show. Click Install to continue.

- Depending on your computer's Touch ID settings, our installer will prompt you to Touch ID or enter your Mac's password to approve it to continue on. Please respond to it appropriately to continue.

- Let the installer do what it needs to do when this screen shows:

- The following will depend on the current configuration of your computer:
If you happen to run this on a computer that is already managed with standard configuration by UCSF IT Field Services, you will get this prompt:

In this scenario, there is no need to run this process because your computer is most likely UCSF-owned and already provisioned by one of your IT support group. You may click Review MSS to go over our minimum security standards or click OK to exit out.
If your computer is not currently managed by any MDM solutions and meets our macOS version requirement, it is eligible for enrollment.

In this scenario, click Continue. The installer will open a website to continue with enrolling your computer into UCSF Jamf Pro.
The following screen will show but we're not done yet. Just click Close to exit out. If proceeding with MDM Enrollment into UCSF Jamf Pro, click here to jump straight straight to further instructions for enrollment.

If your computer is already managed by an MDM solution from another business organization, it cannot enroll into UCSF Jamf Pro and the installer will display this prompt:

In this scenario, click Continue. The installer will skip the Jamf Pro enrollment and proceed with installing UCSF BigFix. BigFix will then finish installing other required security tools, which are FireEye and ForeScout SecureConnector. macOS will prompt you to allow certain permissions of our security tools to run on your computer. Please visit this FAQ page at https://wiki.library.ucsf.edu/x/01r_Hw (VPN is required to view if not on the UCSF network) for more information.
If your computer cannot enroll into Jamf Pro at UCSF for technical reasons, please visit this web page at https://it.ucsf.edu/service/proof-encryption for additional instructions on how to do file a proof of encryption. You will be required to submit the FileVault personal recovery key into a DocuSign form as part of our encryption validation process.
Enrolling your BYOD Mac into Jamf Pro at UCSF
These steps were created using macOS Sequoia and macOS Tahoe. Things may look slightly different for other macOS versions.
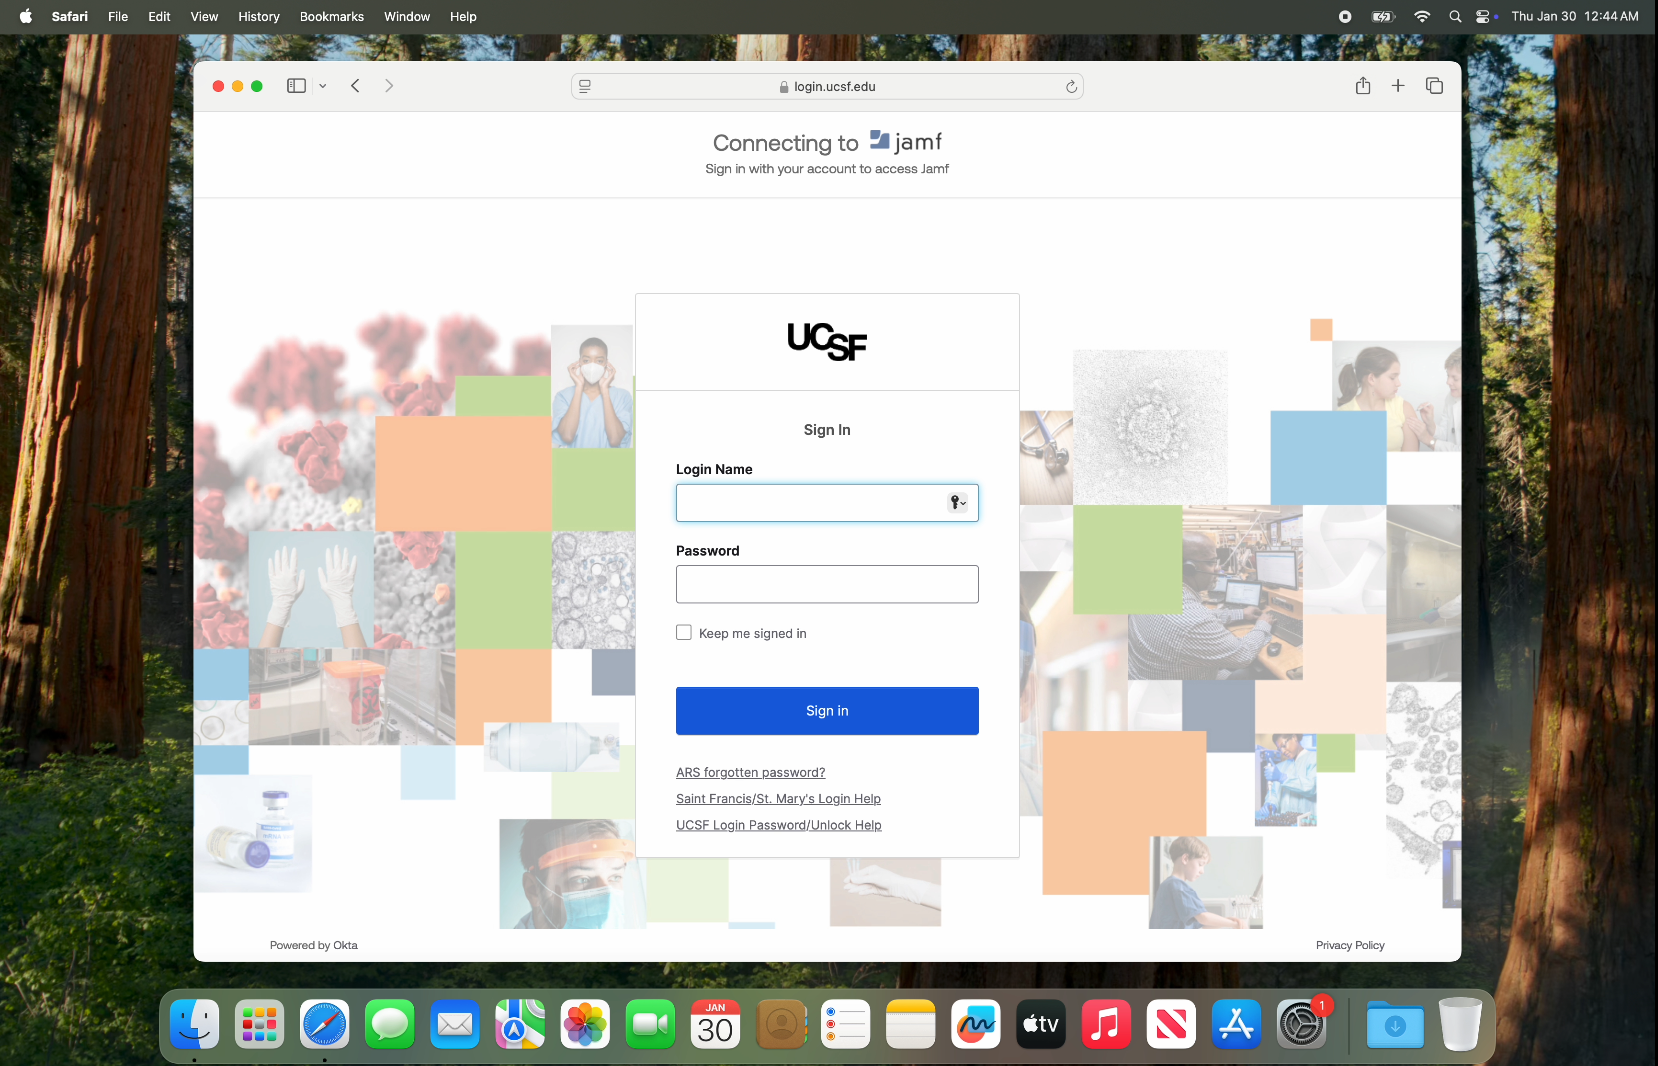
- The installer will open our Jamf enrollment website for you. For BYOD Macs, log in with your UCSF email address and password. For UCSF-owned Macs, enroll through your IT support group or to request help with your Mac's enrollment, submit an IT support ticket.
If you accidentally closed the website, you may re-open it by browsing to https://tiny.ucsf.edu/macenrollment instead of re-running the installer.
When this screen below shows, log in with your UCSF email address and password to process your Mac's enrollment as a BYOD. Duo authentication is required if your computer is outside of UCSF's network.
- Click Continue
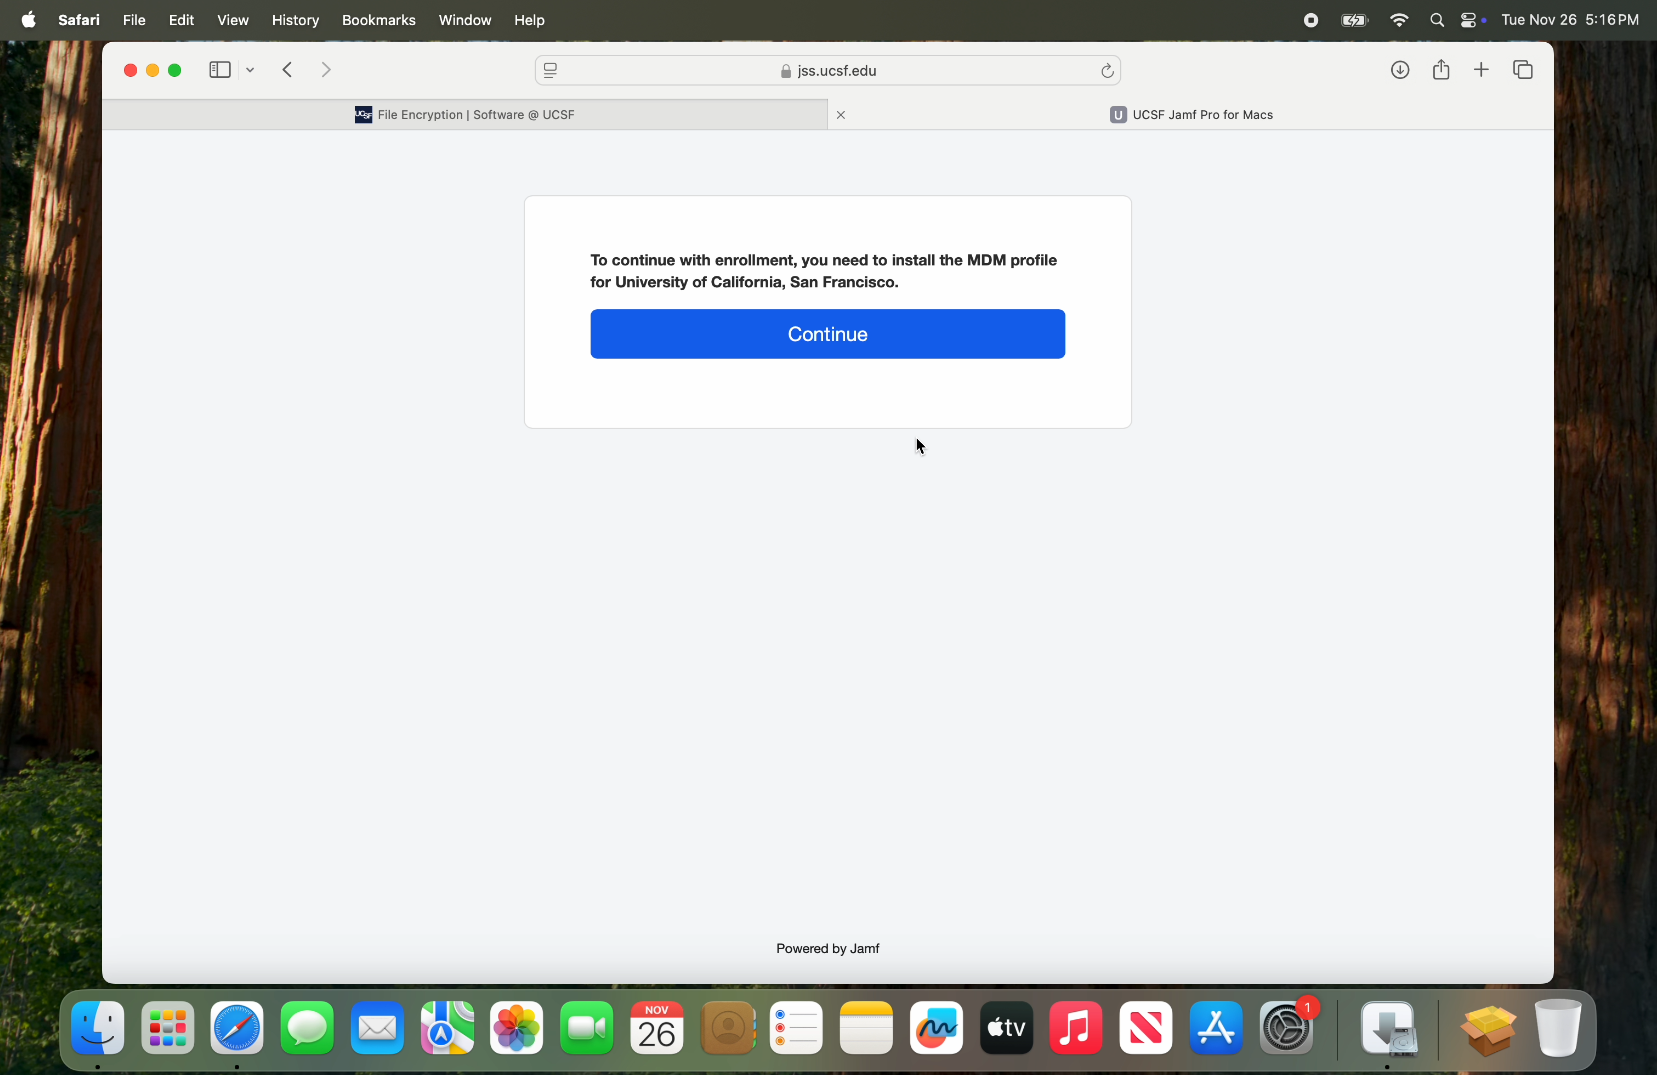
- Download enrollmentProfile.mobileconfig
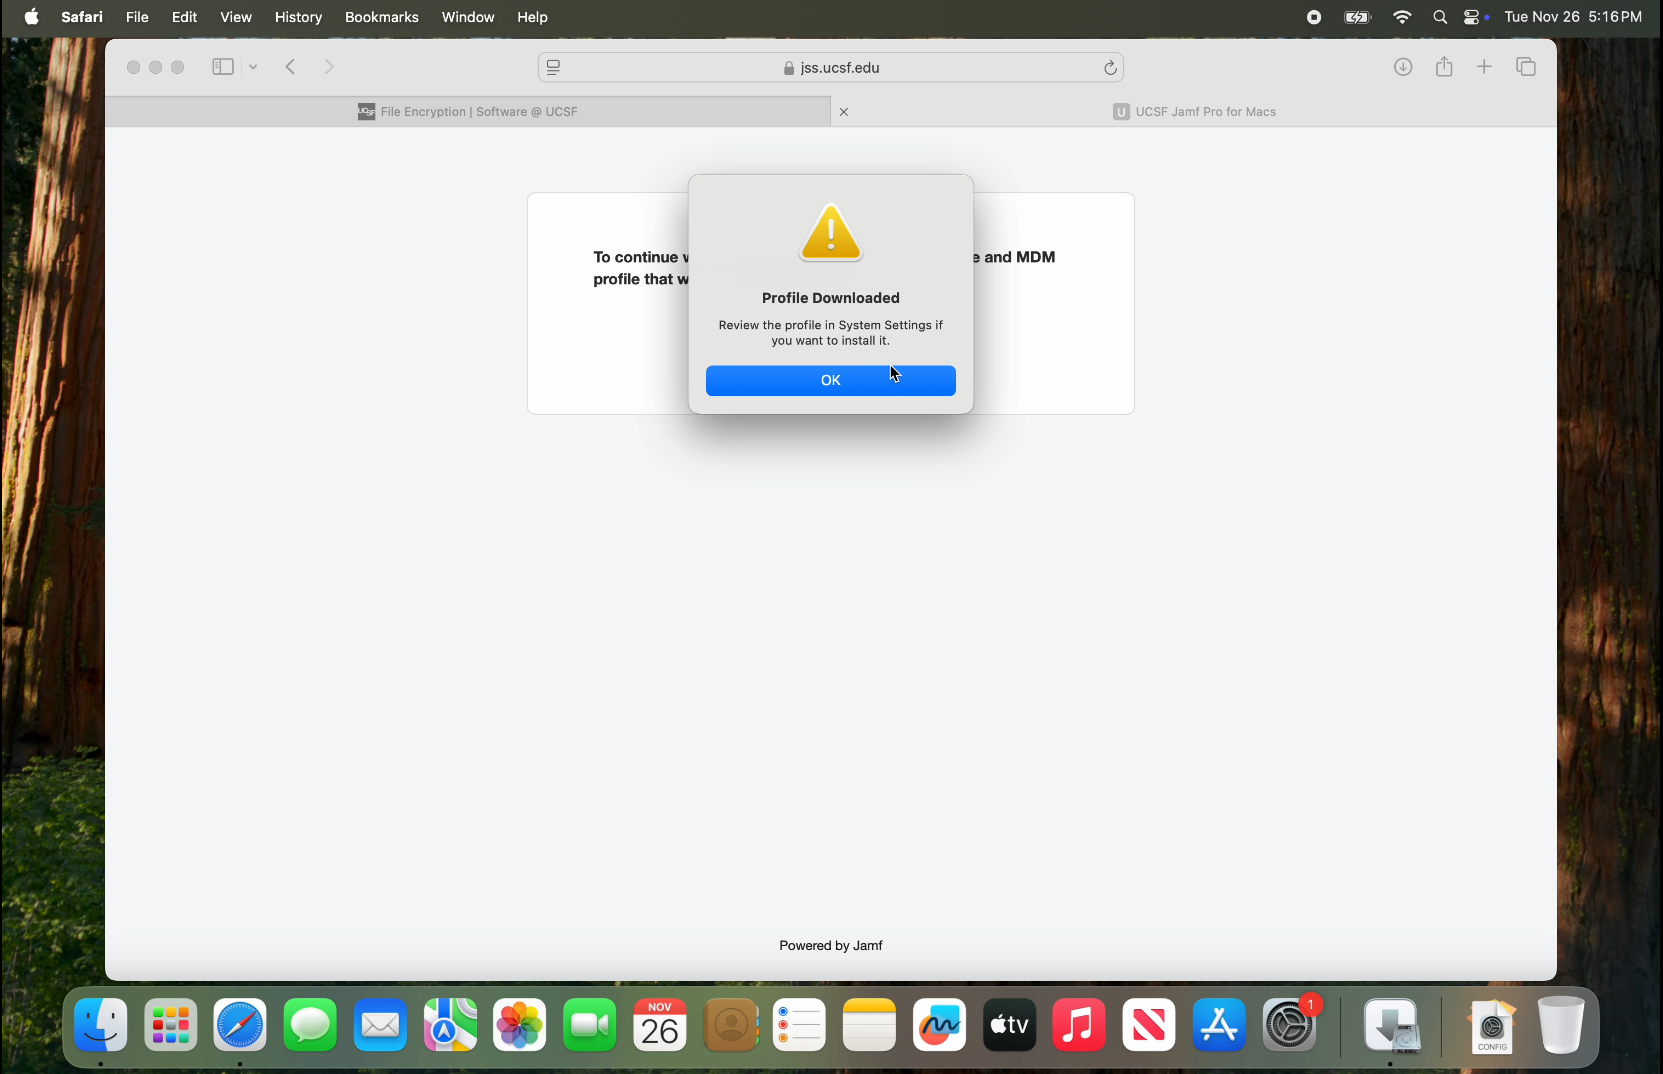
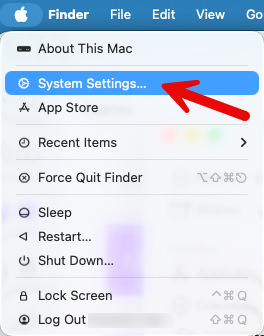
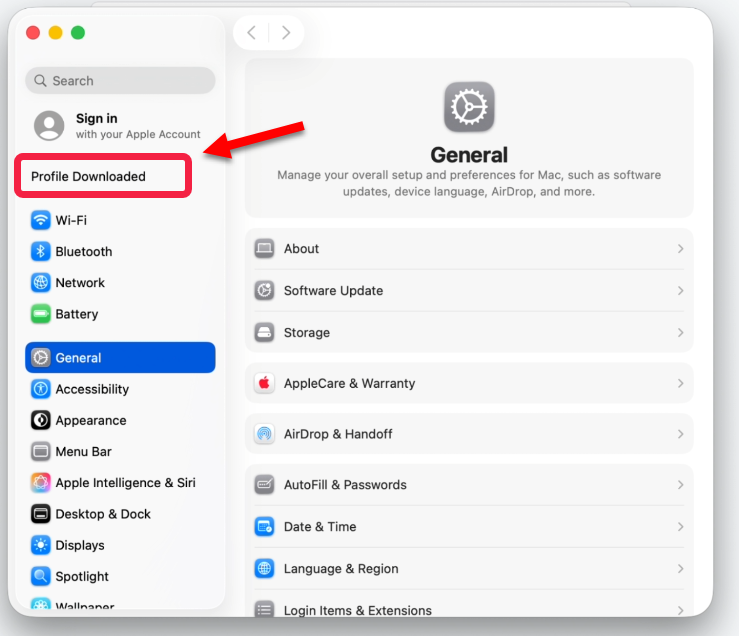
- Click on the Apple menu and select System Settings.
5. Open Privacy & Security > Profiles or General > Device Management
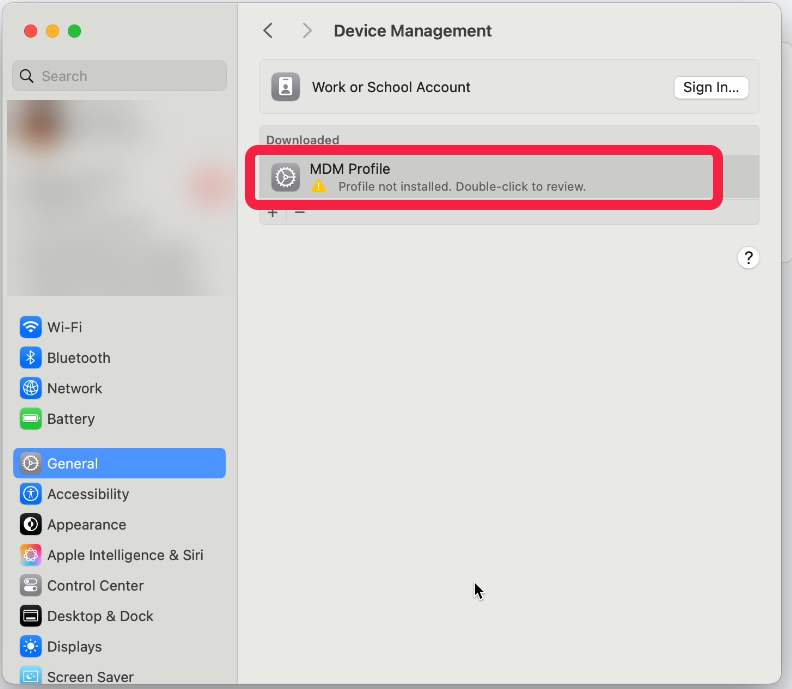
...then double-click on MDM Profile
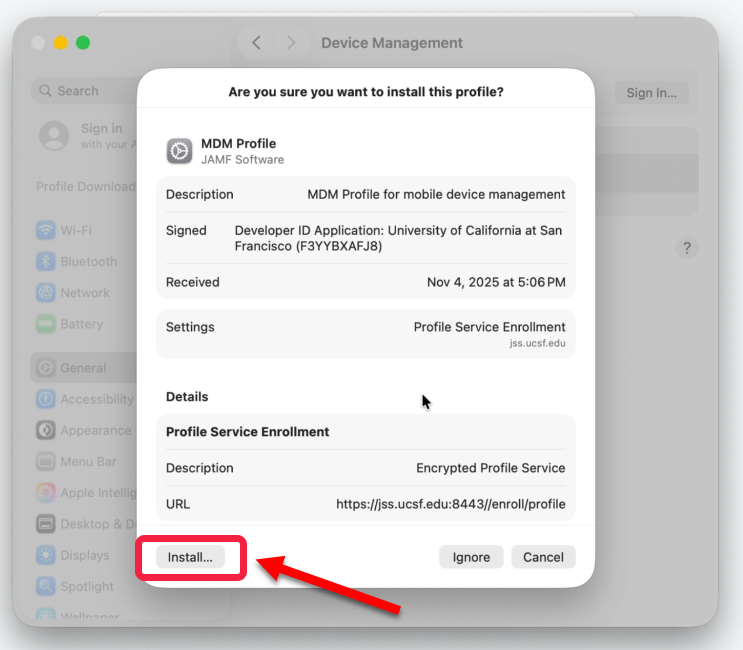
- Click Install
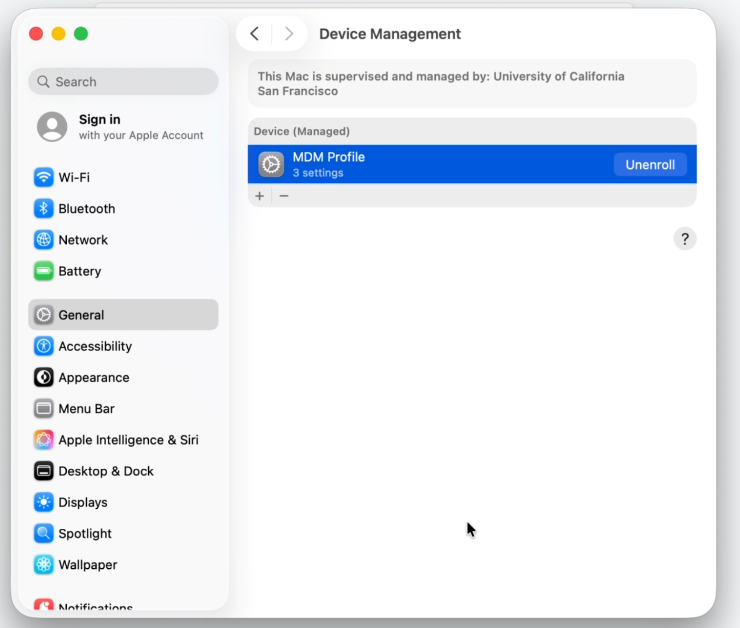
- When prompted to allow Device Management, enter your computer's password, then click Enroll.

- When you see one of the following status below, it means your Mac has enrolled. We're not done yet. Please allow up to 5 minutes for additional security configurations to complete. It will seem like nothing is happening, but required security tools from UCSF are downloading and installing in the background.
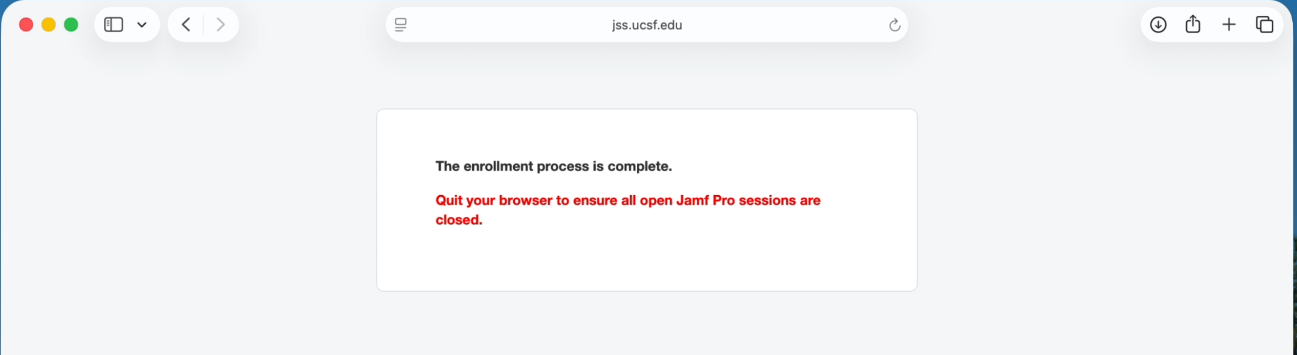
- When this message appears on your web browser, feel free to close it.
- In a moment, you will be prompted to register your computer. Click OK to begin or click More Info to learn more about our BigFix computer registration process.

- Log in to your MyAccess account with your AD username and password.
Duo authentication is required if your computer is outside of UCSF's network.

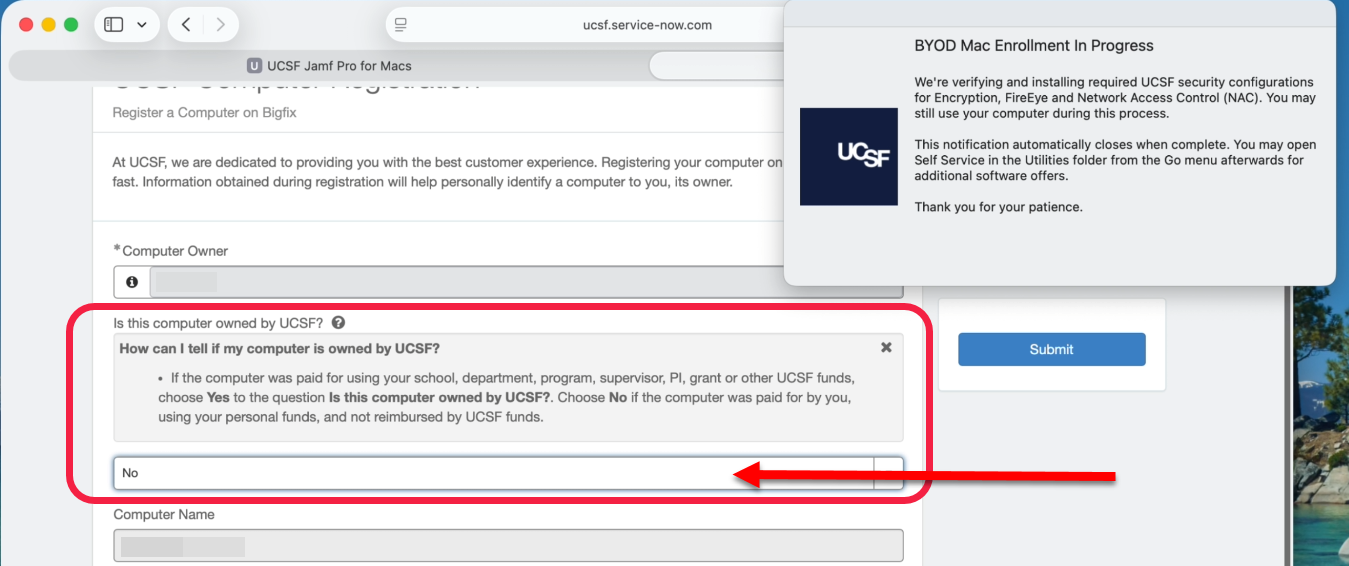
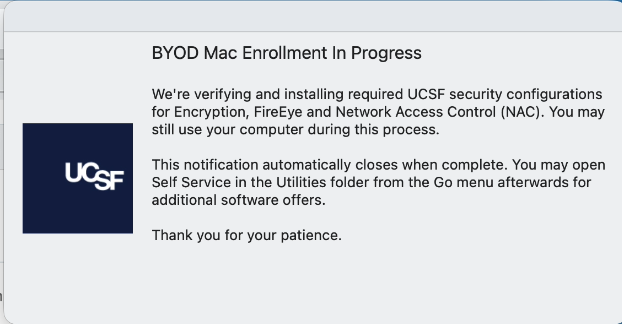
- When the pop-up window entitled BYOD Mac Enrollment In Progress appears, you may still continue our registration process and using your computer. You may drag the pop-up window to another area of your screen if necessary. In the background, our MDM server is provisioning your computer with additional security tools to help comply with our minimum security standards.

- This screen will show after you log in to MyAccess successfully. Just simply answer if your computer is owned by UCSF or not and click Submit. This step is required or else your computer will not register properly.
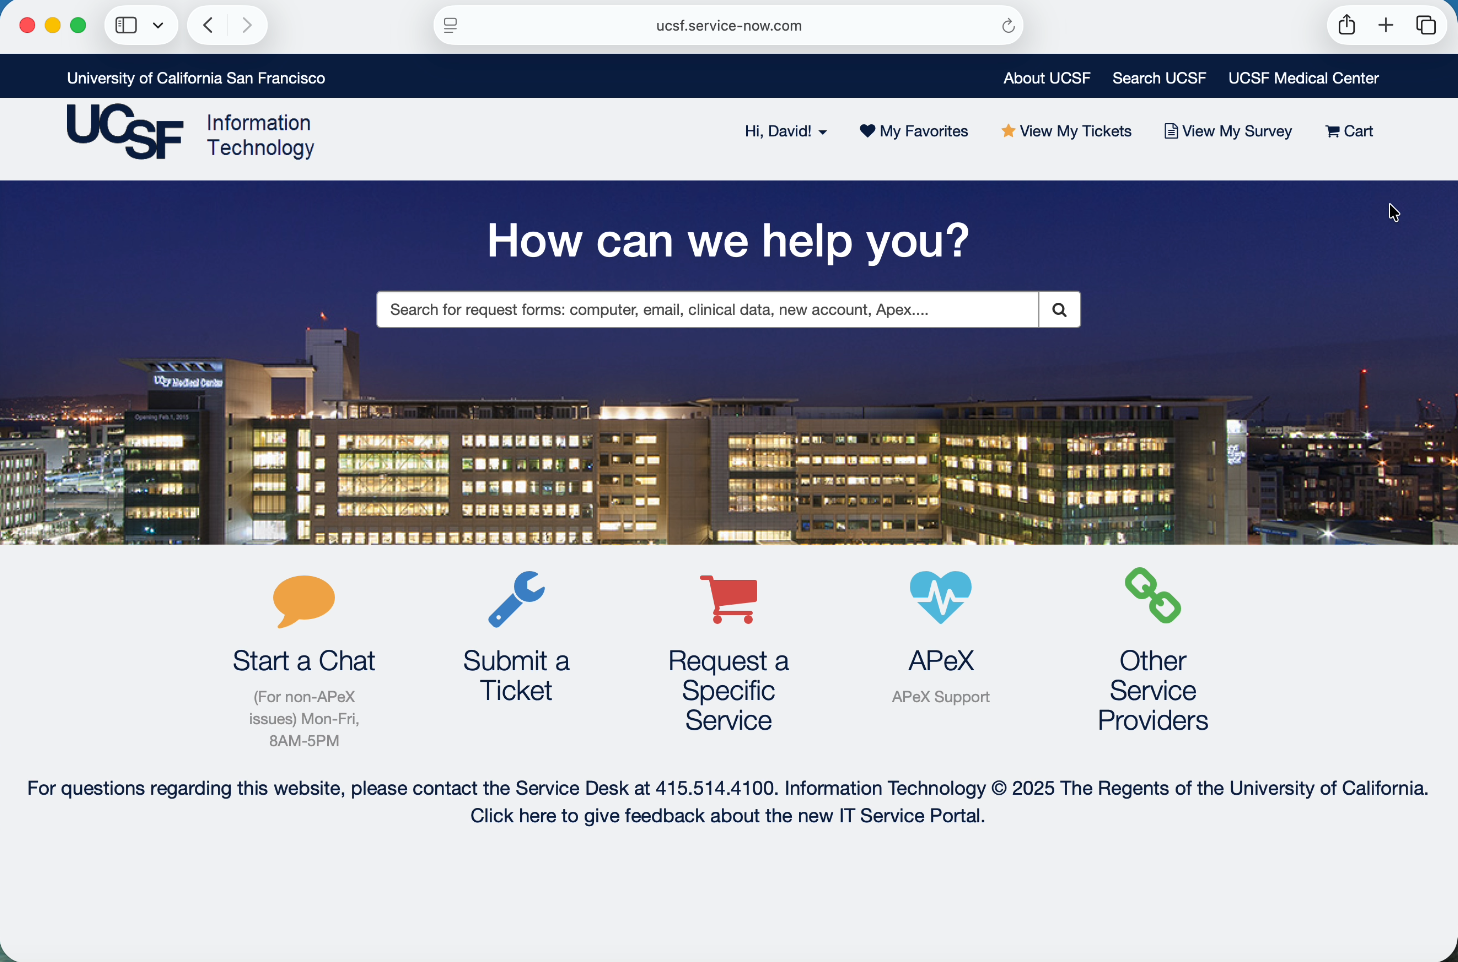
- When our main IT help page loads, it means your computer is registered successfully.
- You may close your web browser and wait until our Jamf Pro server finishes provisioning your computer. The pop-up window shown below will automatically close when this is complete.
If your computer is not encrypted with FileVault, you will eventually see this prompt:
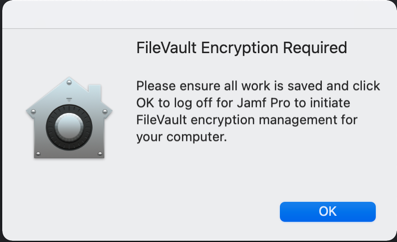
Click OK to log off for Jamf Pro to automatically activate and manage your computer's FileVault encryption.
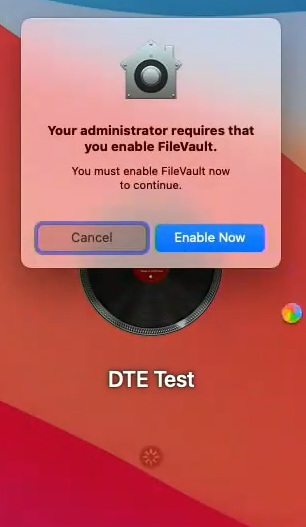
Log back in to your computer. When this dialog below shows, click Enable Now.
Then either click OK or just wait for this process to complete. Login will continue once it's done.
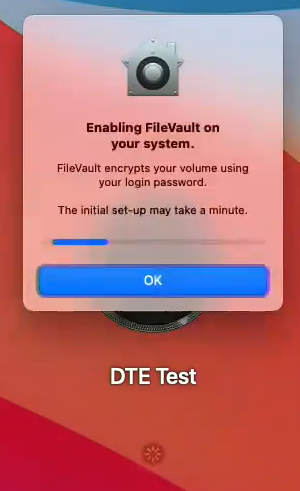
Once the FileVault portion of your computer's enrollment process is done, you're all set to begin using your personal Mac at UCSF. You may also open our Self Service.app located in the Utilities folder of your computer to explore additional software offers that we provide to all Mac computers at UCSF that are enrolled in Jamf Pro. For instructions on how to use Self Service, visit this page at https://wiki.library.ucsf.edu/x/QwiFHg (VPN is required to view if not on the UCSF network)
If you encounter any technical difficulties with the Jamf Pro enrollment process, you may request technical assistance by visiting our website at https://help.ucsf.edu and select Get IT Help.